Upgrade VerteX Management Appliance
This is a Tech Preview feature and is subject to change. Upgrades from a Tech Preview deployment may not be available. Do not use this feature in production workloads.
Follow the instructions to upgrade the VerteX Management Appliance using a content bundle. The content bundle is used to upgrade the Palette VerteX instance to a chosen target version.
The upgrade process will incur downtime for the Palette VerteX management cluster, but your workload clusters will remain operational.
Prerequisites
-
A healthy Palette VerteX management cluster where you can access the Local UI of the leader node.
- Verify that your local machine can access the Local UI, as airgapped environments may have strict network policies preventing direct access.
-
If using an external registry, the Palette CLI must be installed on your local machine to upload the content to the external registry. Refer to the Palette CLI guide for installation instructions.
- Ensure your local machine has network access to the external registry server and you have the necessary permissions to push images to the registry.
-
Access to the Artifact Studio to download the content bundle for Palette VerteX.
- Check that your upgrade path is supported by referring to the Supported Upgrade Paths.
-
If you are upgrading from version 4.7.3, you must perform the following additional steps to prepare your Palette VerteX instance for the upgrade.
Additional steps for upgrading from 4.7.3
-
Log in to the Local UI of the leader node of the Palette VerteX management cluster.
-
From the left main menu, click Cluster.
-
Under Services, click on the
zotservice port to open the internal Zot registry user interface in a new tab. -
Log in to the internal Zot registry using the configured credentials.
tipYou can find the registry configuration in the Cluster > Configuration tab.
-
In the search bar, enter
spectro-content/us-docker.pkg.dev/palette-images-fips/k8s/pauseand select the corresponding repository.If you have chosen a different base path for the registry, ensure you update the
spectro-contentpart of the search query accordingly. -
Click the trash icon for each of the
3.8,3.9, and3.10tags to delete them. Select the DELETE option in the pop-up window when prompted for each tag. -
If you are using an external registry, you must also delete the same image tags from your external registry.
cautionIf these steps are not performed, you may encounter content sync failures for these image tags on the Content page in Local UI. These errors will occur after uploading the content bundle to Local UI. The following image is an example of a content sync failure in Local UI.
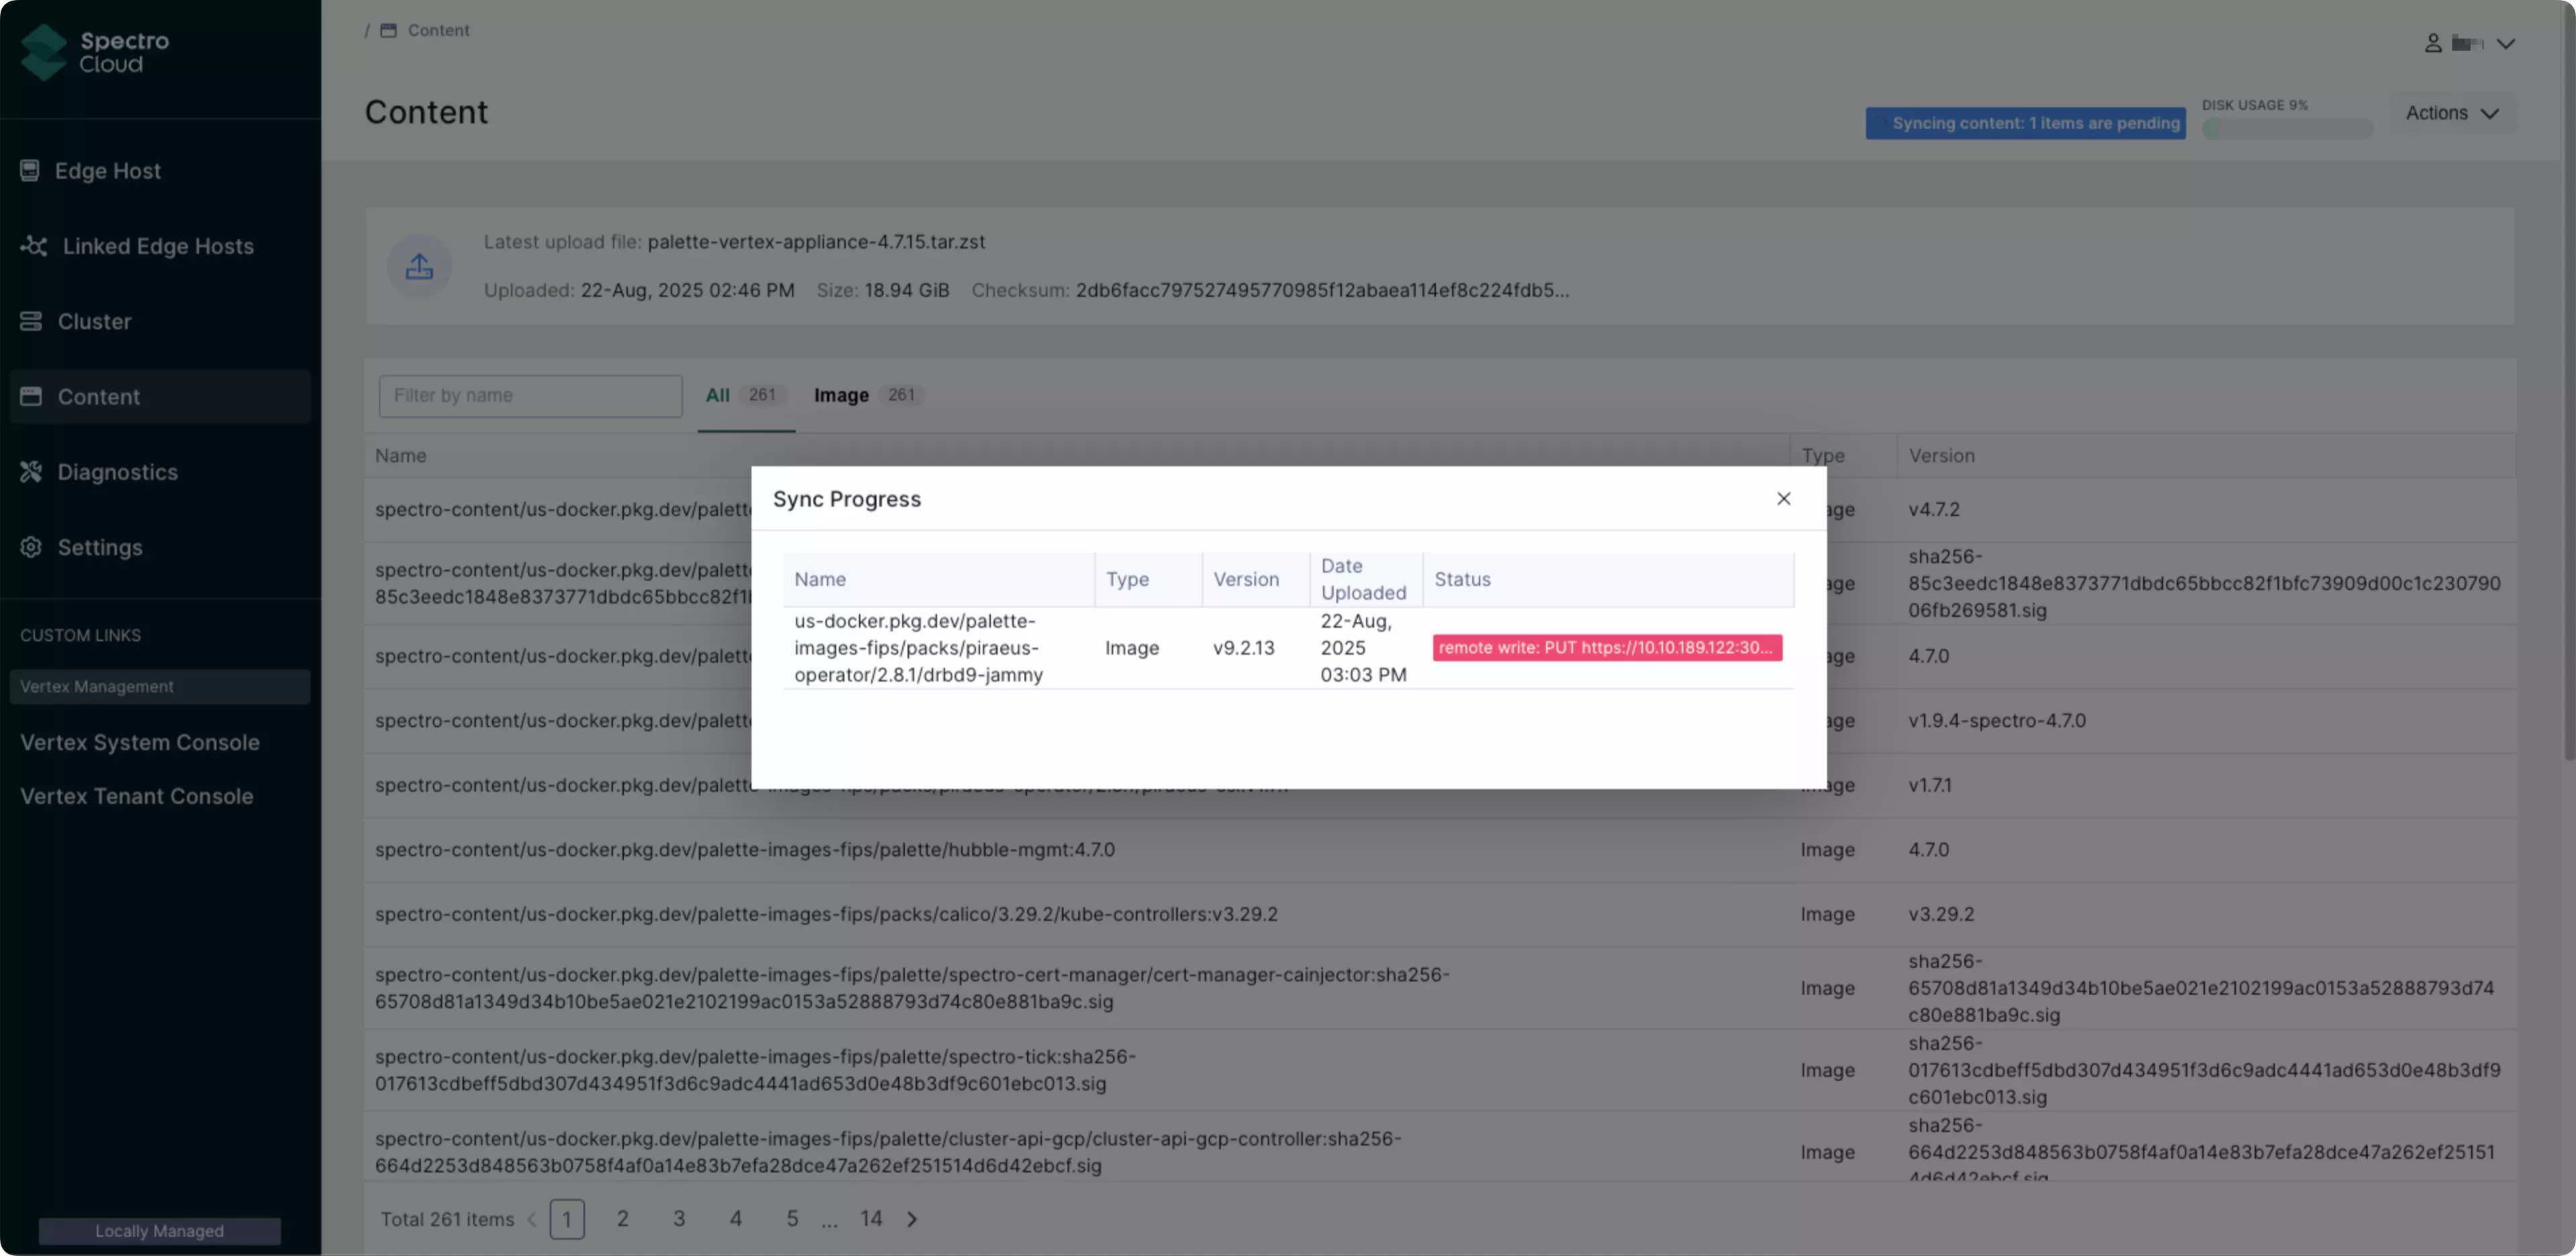
In addition, on the Diagnostics page within the Logs tab, errors may be displayed relating to these image tags that are similar to the following:
Aug 27 12:44:06 edge-1d3f3842cb0fdcef14b65cb510b5974f stylus-operator.sh[18752]: time="2025-08-27T12:44:06Z" level=error msg="failed to push artifact to registrywriting index: PUT https://10.11.12.13:30003/v2/spectro-content/us-docker.pkg.dev/palette-images-fips/k8s/pause/manifests/3.9: MANIFEST_INVALID: manifest invalid; map[description:During upload, manifests undergo several checks ensuring validity. If those checks fail, this error MAY be returned, unless a more specific error is included. The detail will contain information the failed validation. reason:changing manifest media-type from \"application/vnd.docker.distribution.manifest.v2+json\" to \"application/vnd.docker.distribution.manifest.list.v2+json\" is disallowed reference:3.9]" version=v4.7.2 clusterIf any other image tags fail to sync with a similar error after the content bundle is uploaded, you must manually delete those tags from the internal Zot registry and any external registry you are using.
-
Upgrade Palette VerteX
- Internal Zot Registry
- External Registry
-
Navigate to the Artifact Studio through a web browser, and under Install Palette VerteX, click on the drop-down menu and select the version you want to upgrade your VerteX Management Appliance to.
-
Click Show Artifacts to display the Palette VerteX Artifacts pop-up window. Click the Download button for the Content bundle (including Ubuntu).
-
Wait until the content bundle is downloaded to your local machine. The bundle is downloaded in
.tar.zstformat alongside a signature file insig.binformat.tipRefer to the Artifact Studio guide for detailed guidance on how to verify the integrity of downloaded files using the provided signature file.
-
Log in to the Local UI of the leader host of the Palette VerteX management cluster. By default, Local UI is accessible at
https://<node-ip>:5080. Replace<node-ip>with the IP address of the leader host. -
From the left main menu, click Content.
-
Click Actions in the top right and select Upload Content from the drop-down menu.
-
Click the Upload icon to open the file selection dialog and select the content bundle file from your local machine. Alternatively, you can drag and drop the file into the upload area.
The upload process starts automatically once the file is selected. You can monitor the upload progress in the Upload Content dialog.
Wait for the File(s) uploaded successfully confirmation message or the green check mark to appear next to the upload progress bar.
-
On the Content page, wait for the content to finish syncing. This is indicated by the Syncing content: (N) items are pending banner that appears to the left of disk usage. The banner will disappear once the sync is complete. This can take several minutes depending on the size of the content bundle and your internal network speed.
-
From the left main menu, click Cluster and select the Configuration tab.
-
Click the Update drop-down menu and select Review Changes.
-
Review the changes for each profile carefully and ensure you are satisfied with the proposed updates. There may be changes to the profiles between versions that include the addition or removal of properties.
warningSome upgrade paths require you to re-enter the configuration values you provided during the initial Palette VerteX installation. This includes the OCI Pack Registry Password and any other non-default settings.
Click Confirm Changes once satisfied.
-
Click Update to start the upgrade process.
During the upgrade process, the Palette VerteX system and tenant consoles will be unavailable, and a warning message will be displayed when attempting to log in. You can monitor the upgrade progress in the Overview tab on the Cluster page.
When using an external registry, you must upload the content bundle to both the external registry and the internal Zot registry as they both need to have the content for the upgrade process. The following steps include instructions for uploading the content bundle to both registries.
-
Navigate to the Artifact Studio through a web browser, and under Install Palette VerteX, click on the drop-down menu and select the version you want to upgrade your VerteX Management Appliance to.
-
Click Show Artifacts to display the Palette VerteX Artifacts pop-up window. Click the Download button for the Content bundle (including Ubuntu).
-
Wait until the content bundle is downloaded to your local machine. The bundle is downloaded in
.tar.zstformat alongside a signature file insig.binformat.tipRefer to the Artifact Studio guide for detailed guidance on how to verify the integrity of downloaded files using the provided signature file.
-
Open a terminal on your local machine and navigate to the directory where the content bundle file is located.
-
Use the Palette CLI to log in to your external registry. Replace
<registry-dns-or-ip>with the DNS/IP address of your registry,<registry-port>with the port number of your registry (if applicable),<username>with your username, and<password>with your password.palette content registry-login \
--registry https://<registry-dns-or-ip>:<registry-port> \
--username <username> \
--password <password> -
Upload the file to your external registry using the Palette CLI. Replace
<content-bundle-zst>with your downloaded content bundle file,<registry-dns-or-ip>with the DNS/IP address of your registry, and<registry-port>with the port number of your registry (if applicable). If you have changed the base content path from the default, replacespectro-contentwith the correct content path.If you are using custom TLS certificates or choosing to skip TLS, use the appropriate flags as shown in the following examples.
- Custom TLS Certificate
- Skip TLS
palette content push \
--registry <registry-dns-or-ip>:<registry-port>/spectro-content \
--file <content-bundle-zst> \
--ca-cert <path-to-ca-cert> \
--tls-cert <path-to-tls-cert> \
--tls-key <path-to-tls-key>
palette content push \
--registry <registry-dns-or-ip>:<registry-port>/spectro-content \
--file <content-bundle-zst> \
--insecureThe following example output is expected when an upload is successful.
Example output...
INFO[0366] successfully copied all artifacts from local bundle /root/tmp/bundle-extract/palette-enterprise-appliance-4.7.9.tar to remote bundle external.registry.com/spectro-content/bundle-definition:palette-enterprise-appliance-4.7.9
-----------------------------
Push Summary
-----------------------------
local bundle palette-enterprise-appliance-4.7.9 pushed to external.registry.com/spectro-contenttipBe aware of the timeout period for the authentication token. If the authentication token expires, you will need to re-authenticate to the OCI registry and restart the upload process.
-
Log in to the Local UI of the leader host of the Palette VerteX management cluster. By default, Local UI is accessible at
https://<node-ip>:5080. Replace<node-ip>with the IP address of the leader host. -
From the left main menu, click Content.
-
Click Actions in the top right and select Upload Content from the drop-down menu.
-
Click the Upload icon to open the file selection dialog and select the content bundle file from your local machine. Alternatively, you can drag and drop the file into the upload area.
The upload process starts automatically once the file is selected. You can monitor the upload progress in the Upload Content dialog.
Wait for the File(s) uploaded successfully confirmation message or the green check mark to appear next to the upload progress bar.
-
On the Content page, wait for the content to finish syncing. This is indicated by the Syncing content: (N) items are pending banner that appears to the left of disk usage. The banner will disappear once the sync is complete. This can take several minutes depending on the size of the content bundle and your internal network speed.
-
From the left main menu, click Cluster and select the Configuration tab.
-
Click the Update drop-down menu and select Review Changes.
-
Review the changes for each profile carefully and ensure you are satisfied with the proposed updates. There may be changes to the profiles between versions that include the addition or removal of properties.
warningSome upgrade paths require you to re-enter the configuration values you provided during the initial Palette VerteX installation. This includes the OCI Pack Registry Password and any other non-default settings.
Click Confirm Changes once satisfied.
-
Click Update to start the upgrade process.
During the upgrade process, the Palette VerteX system and tenant consoles will be unavailable, and a warning message will be displayed when attempting to log in. You can monitor the upgrade progress in the Overview tab on the Cluster page.
If the upgrade process stalls, this may be due to the linstor-satellite.* pods not using the correct image for the
drbd-module-loader container. Refer to
Scenario - VerteX Management Appliance Fails to Upgrade due to Stuck Linstor Satellite Pods
for more information.
Validate
-
Log in to the Local UI of the leader host of the Palette VerteX management cluster. By default, Local UI is accessible at
https://<node-ip>:5080. Replace<node-ip>with the IP address of the leader host. -
From the left main menu, click Cluster.
-
Check that the
palette-mgmt-planepack displays the upgraded version number and is in a Running status. -
Verify that you can log in to the Palette VerteX system console and no warning message is displayed.
-
If you have configured a tenant, log in to the tenant console and verify that Palette displays the correct version number.