Enable SSO with Microsoft Entra ID
Single Sign-On (SSO) is an authentication method that enables users to log in to multiple applications and websites with one set of credentials. SSO uses Secure Socket Layer (SSL) certificates to establish and maintain trust between the Service Provider (SP) and an Identity Provider (IDP).
OpenID Connect (OIDC) lets developers authenticate users across websites and apps without owning and managing password files. This technology allows Palette to verify the identity of the person currently using the browser or application.
In October 2023, Microsoft renamed Azure Active Directory to Microsoft Entra ID. For the purposes of this guide, please consider Microsoft Entra ID and Azure Active Directory to be synonymous. Microsoft Entra ID securely manages anything to do with the user's information, access, and the trust relationships between parties in a flow. It authenticates the user's identity, grants and revokes access to resources, and issues tokens.
This document will guide you on deploying and enabling SSO with Microsoft Entra based on OIDC for integration with Palette and Kubernetes clusters.
If you want to enable OIDC at the Kubernetes cluster level, refer to the Enable OIDC in Kubernetes Clusters section.
Enable OIDC SSO in Palette
Use the following steps to enable OIDC SSO in Palette with Microsoft Entra ID.
Limitations
- By default, Entra ID returns the group membership in the form of group IDs (such as
a99cb9c2-b9df-4363-b91e-feb1a68670cd), not group names. This can present usability challenges, as Team names in Palette must use the returned group IDs to enable automatic membership. Depending on your environment, Entra may be able to send group names instead of IDs. For more information, refer to step 11 of the Configure Microsoft Entra ID with Palette section.
Prerequisites
-
Palette or Palette VerteX version 4.0.X or greater.
-
For Microsoft Entra ID to work correctly with Palette, you must enable HTTPS and configure TLS.
-
A Microsoft Entra ID subscription. You will need an account with one of the following roles: Global Administrator, Cloud Application Administrator, or Application Administrator. Alternatively, you may be the owner of the service principal.
-
If you want to use the same Microsoft Entra ID application for OIDC-based SSO in your Kubernetes cluster itself, you need to install kubelogin on your local workstation to handle retrieval of access tokens for your cluster.
-
Palette requires the following claims to be present in the OIDC token:
Claim Name Default Value Description Email preferred_usernameThe user's login name in email address form. First Name given_nameThe user's first name. Last Name family_nameThe user's last name. Spectro Team groupsThe user's group memberships in the Identity Provider. Change the claim names in your IDP if they are different from the default values. Valid options for the Email claim are
emailorpreferred_username.tip- We recommend using
preferred_usernamefor the Email claim, as this field will always be populated and match the user's login name for Entra. Because theemailfield may be empty or inconsistent with the user's Entra login name, it is generally not recommended for identification. - If the OIDC token does not contain the required claims, or if the user belongs to many groups, enable the Use userinfo endpoint option in the OIDC configuration. This allows Palette to fetch claims from the user information endpoint rather than the size-limited ID token.
- We recommend using
Configure Microsoft Entra ID with Palette
-
Log in to Palette as a Tenant Admin.
-
Navigate to the left main menu and select Tenant Settings. From the Tenant Menu, select SSO, and on the Configure tab, choose OIDC.
-
Copy the Callback URL to your clipboard. This URL will be used in step 14 to configure the Microsoft Entra ID app registration.
-
In a separate browser tab, log in to the Microsoft Entra ID Admin console and open the App registration blade.
-
Click on New registration and assign a name to the new registration. In this guide, the example app registration is named
palette-oidc. -
Click Register.
-
From the app overview page, navigate to the left main menu and select Certificates & secrets. On the following screen, click on New client secret.
-
Add a description for the secret and select an expiration period. Click on Add to create the secret.
warningWe recommend you store the secret value in a secure location, such as a password manager. You will need this value later when you configure Palette.
-
From the application overview page, navigate to the left main menu and select Token configuration.
-
Select Add optional claim. Choose Token type as the ID, and add the claims
email,family_name,given_name, andpreferred_username. When finished, select Add.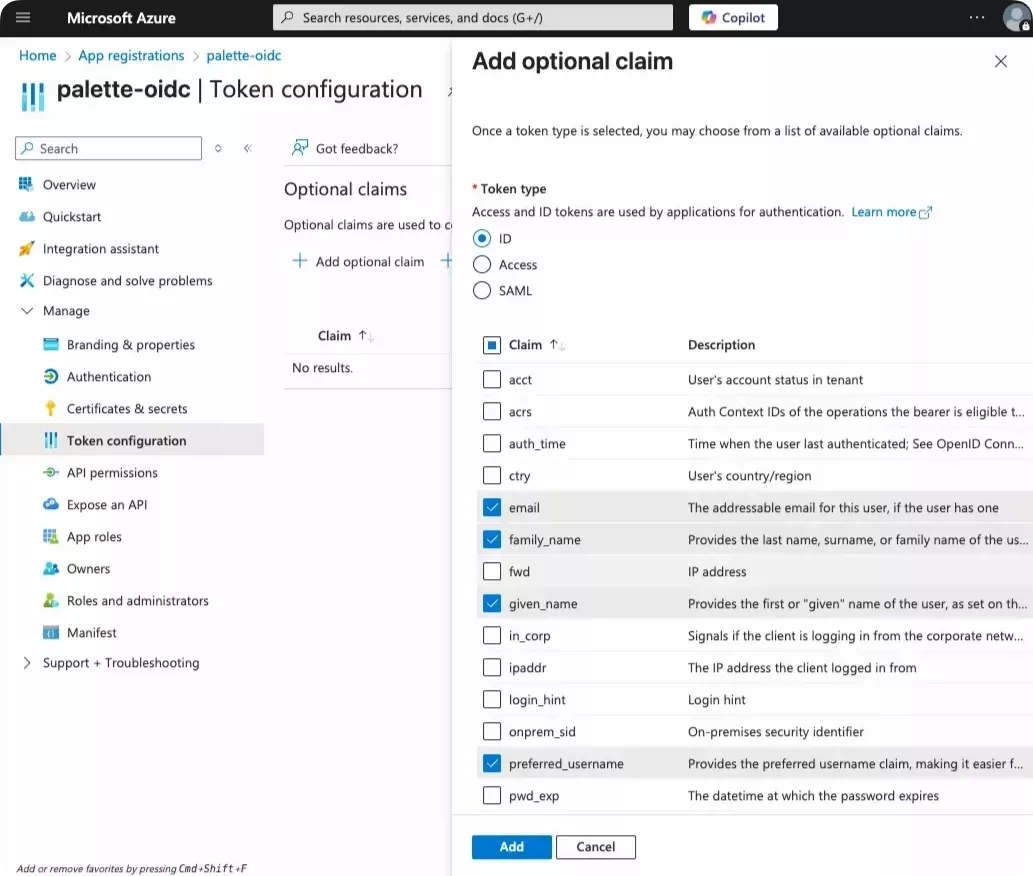 info
infoIf you are still using Entra v1 ID tokens, the claims
family_nameandgiven_nameare already included and do not need to be added. -
In addition to allowing individual user authentication, Palette also supports group claims, allowing Microsoft Entra ID to pass a user's group membership information, which gets mapped to Teams within Palette.
To pass group membership claims, select Add groups claim. Select the type of claim that fits your scenario.
-
Security groups - This option causes Entra to include security group membership in the OIDC token. By default, Entra sends these groups by group ID, not as names. If your security groups are synchronized to Entra from an on-premise Active Directory, you can configure Entra to send the groups using the
sAMAccountNameinstead. Note that this does not work for groups created in Entra directly. -
Groups assigned to the application - This option limits claims to groups that are both assigned to the
palette-oidcEnterprise Application and that the user is a member of. This approach is recommended for users who belong to many groups; however, it requires an Entra P1 or higher subscription. By default, Entra sends these groups as group IDs, but this can be adjusted later to send group names instead of group IDs.
Regardless of which option you select, Entra will send group claims as group IDs unless configured otherwise. To send group claims as group IDs, select Add to complete the wizard, and proceed to step 12. To adjust how groups are sent, follow the appropriate steps below, depending on your selection.
-
Security groups - If your security groups come from an on-premise Active Directory environment and you want to send the groups by
sAMAccountNameinstead, adjust the Customize token properties by type section and select thesAMAccountNameoption for all three items (ID, Access, and SAML). Select Add to complete the wizard. -
Groups assigned to the application - If you want your application groups to be sent by name, select Add to complete the wizard, navigate to the left main menu, and select Manifest. In the JSON code, navigate to the
idTokensection and search for thename: "groups"block. Change"additionalProperties": [],to"additionalProperties": ["cloud_displayname"],and Save the manifest. The block should look as follows."idToken": [
...
{
"additionalProperties": ["cloud_displayname"],
"essential": false,
"name": "groups",
"source": null
}
],
When completed, the Token Configuration page will look similar to the image below.

-
-
From the application overview page, navigate to the left main menu and select Authentication.
-
Under Platform configurations, click Add a platform and select Web on the Configure platforms window.
-
Paste the Callback URL value obtained in step 3 into the Redirect URIs field, and click Configure.
Additional Redirect URLs
You can also add additional redirect URLs if needed. For example, to enable integration with the Kubernetes Dashboard, add the following Single-page application redirect URIs to the app registration.
URL Type of Access http://localhost:8000Use kubectlwith thekube-loginplugin from a workstation.https://<fqdn_of_k8s_dashboard>/oauth/callbackUse Entra ID to authenticate with OIDC to the Kubernetes Dashboard. -
From the application overview page, navigate to the left main menu and select the Overview tab. From the Overview selection, save the following fields for the next steps you will complete in Palette.
Field Description Application (client) ID The unique identifier for your Azure application. Directory (tenant) ID The unique identifier for your Azure AD tenant. Secret Value The value of the client secret you created in the previous steps. -
From the application overview page, navigate to the left main menu and select API permissions.
-
Click Add a permission and select Microsoft Graph from the Request API permissions window.
-
Select the following permissions for the app.
Type Category Permission Admin consent required Delegated OpenId permissions emailNo Delegated OpenId permissions openidNo Delegated OpenId permissions profileNo Delegated User User.ReadNo -
Select Add permissions.
-
To assign groups to the application, follow the below procedure to set the groups that can be passed to Palette. Otherwise skip this step.
Assign Groups to the Application
-
Navigate to the Microsoft Entra ID Enterprise applications page.
-
Open the
palette-oidcapplication and select Users and groups. Select Add user/group. -
On the Add Assignment page, under Users and Groups, select None Selected. Select the Groups column to list the groups.
-
Select all eligible groups that can be passed to Palette. When finished, choose Select to confirm your selection.
-
Assign the selected groups to the application.
-
-
If you chose the default option of sending group membership by group IDs, use the following procedure to define Teams in Palette based on group IDs. If you are sending groups by name, skip this step.
Match Group IDs to Palette Teams
-
Navigate to the Microsoft Entra ID Groups page.
-
Find the groups you want to add to Palette and record each group's Name and Object ID. You will use this information in future steps to configure Palette.
-
Log in to Palette as a Tenant Admin.
-
From the left main menu, select Users and Teams.
-
On the Teams tab, select Create team.
-
Create your Palette teams, with each team named after the Entra ID Group ID you recorded. The following table is an example configuration.
Palette Team Name is the Entra Group ID Entra ID Group Name e3ac07cc-bd12-4edc-92a4-983d783153bapalette_tenant_admins88f61c49-1dd1-40c3-a820-68a513a38725palette_default_project_admins3f33c3a5-e0af-4ef6-9671-c7545fe264f3k8s_cluster_adminsc4606295-e8b0-4df0-891b-de4428d7e54fk8s_cluster-editor -
Assign Roles to each Palette team. The following table is an example configuration.
Palette Team Name Role Entra ID Group Name e3ac07cc-bd12-4edc-92a4-983d783153baTenant Admin palette_tenant_admins88f61c49-1dd1-40c3-a820-68a513a38725Project Admin palette_default_project_admins3f33c3a5-e0af-4ef6-9671-c7545fe264f3No role assigned k8s_cluster_adminsc4606295-e8b0-4df0-891b-de4428d7e54fNo role assigned k8s_cluster-editor
-
-
If you selected the option to send group membership by group name, use the following procedure to define Teams in Palette based on group names. If you are sending groups by ID, skip this step.
Match Group Names to Palette Teams
-
Log in to Palette as a Tenant Admin.
-
From the left main menu, select Users and Teams.
-
On the Teams tab, select Create team.
-
Create your Palette teams, with each team named after the Entra ID Group Name. This is either the
sAMAccountNamefor a security group synced from Active Directory or the regular group name of a group assigned to thepalette-oidcEnterprise Application. -
Assign Roles to each Palette team. The following table is an example configuration.
Palette Team Name Role palette_tenant_adminsTenant Admin palette_default_project_adminsProject Admin k8s_cluster_adminsNo role assigned k8s_clusterNo role assigned
-
-
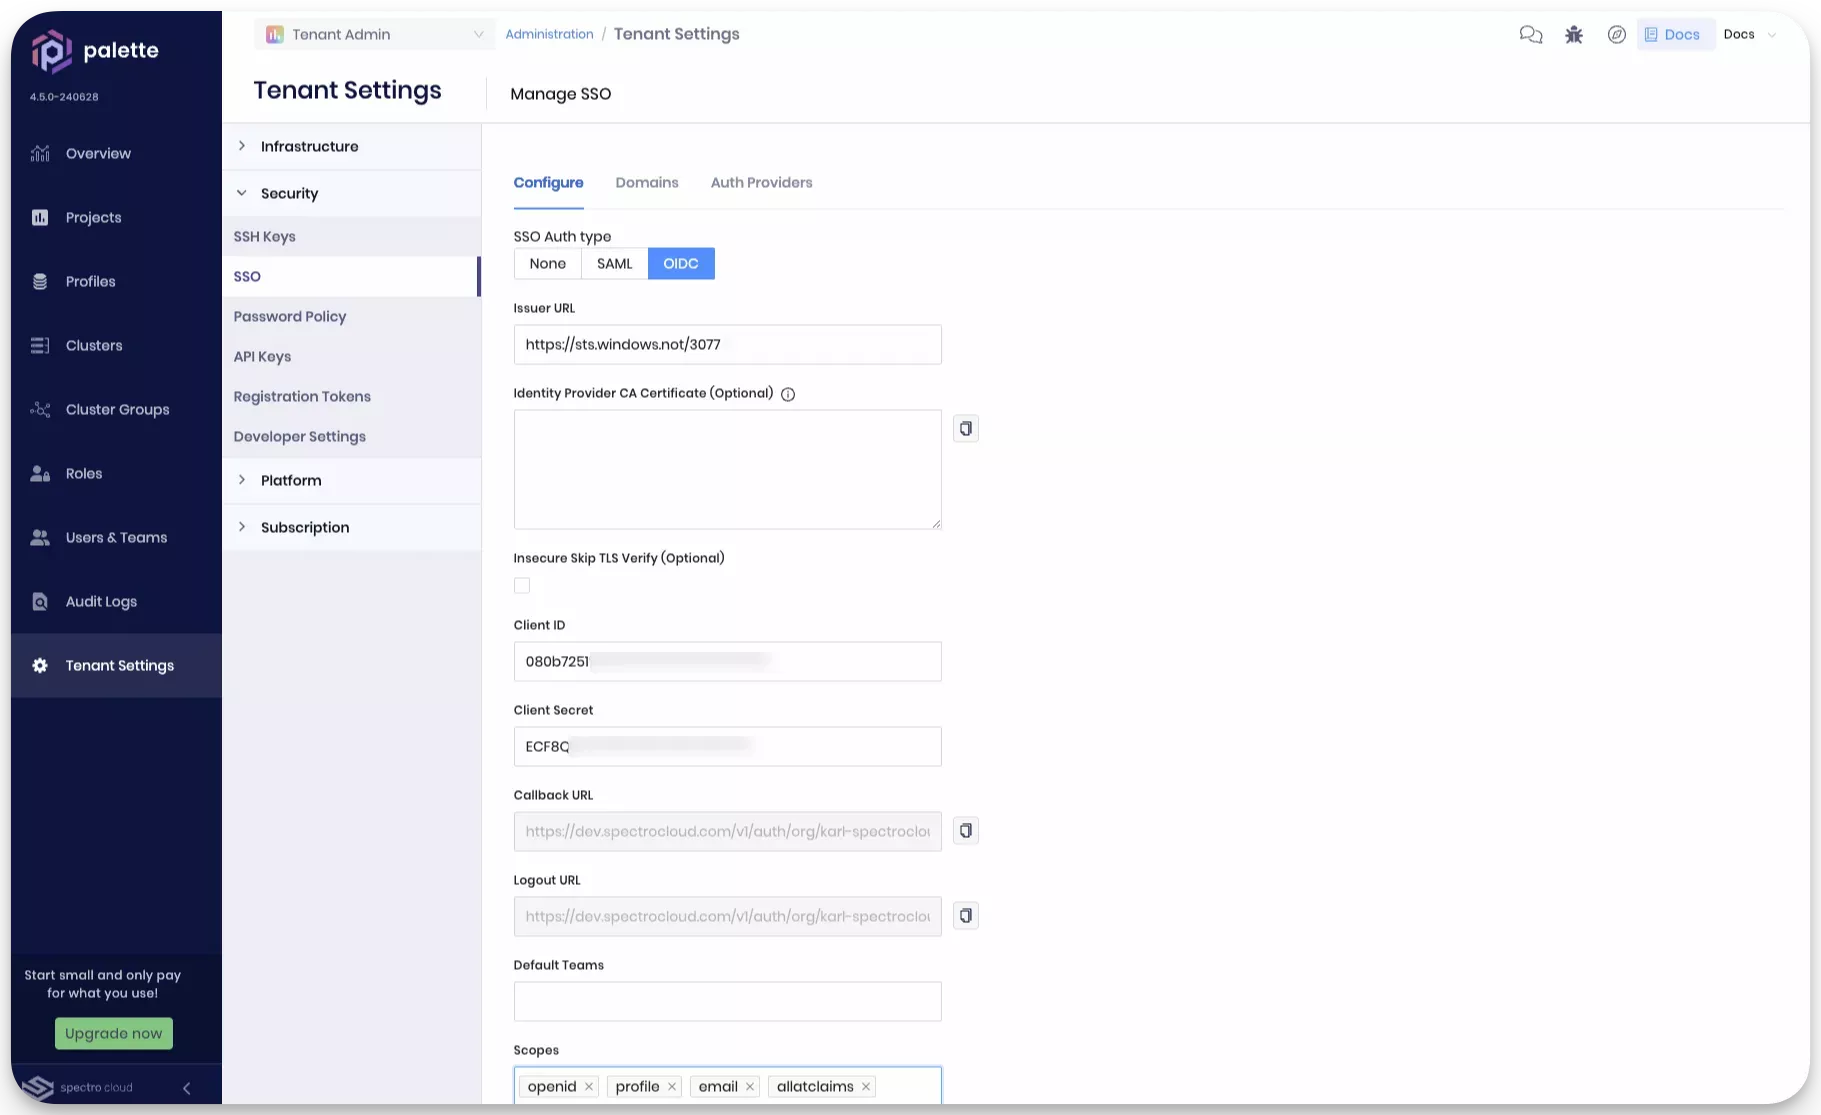
Navigate to left main menu and select Tenant Settings. Next, click on SSO and select the OIDC tab.
-
Configure the OIDC settings in Palette. Use the table below as a reference and populate the fields with the information you saved from the previous steps.
Field Description Issuer URL Refer to the Find your app's OpenID configuration document URI guide to learn how to determine your issuer URL. This will often be the same as the Authority URL and not contain the Well-known configuration document path appended. If you use Entra v2 tokens with the endpoint https://login.microsoftonline.com/{tenant-ID}/v2.0, ensure you added the claimsfamily_nameandgiven_nameto the token configuration.Client ID The application ID from Entra ID. Client Secret The application secret you created. Default Teams Leave blank if you do not want users without group claims to be assigned to a default group; otherwise, enter the desired default group name. If you use this option, be careful with how much access you assign to the group. Scopes Add openid,profileandemail.Email Use emailas the default value. -
Leave other fields with the default values and click Enable. If all required values are provided, you will receive a message stating that OIDC is configured successfully.
You have now successfully configured OIDC SSO in Palette. Next, validate the configuration by logging in to Palette with an Entra ID user account.
Validate
-
Log out of Palette. To log out, click on User Menu in the top right corner of the screen and select Sign Out.
-
The Palette login screen now displays a Sign in button and no longer presents a username and password field. If this is your first time logging in with SSO, you will be redirected to the Entra ID login page. Depending on your organization's SSO settings, this could be a simple login form or require MFA (Multi-Factor Authentication). Make sure you log in as a user who is a member of a Entra ID group that was added to Palette. Once authenticated, you will automatically be redirected back to Palette and logged into Palette as that user.
-
Navigate to the left main menu and ensure the Tenant Settings option is available. If the Tenant Settings option is not available, then you are not logged in as a user who is a member of a Entra ID group that was added to Palette.
tipBelow the Sign In button, there is a link titled SSO issues? --> Use your password. The link can be used to bypass SSO and log in with a local Palette account in case there is an issue with SSO and you need to access Palette without SSO.
Enable OIDC in Kubernetes Clusters With Entra ID
Kubelogin is a kubectl plugin for Kubernetes OIDC authentication. When you use kubectl, kubelogin opens up your browser, starts a session, and redirects you to your IDP login site. Upon a successful login, you receive an authentication token that is used to grant you access to the cluster.
Use the following steps to enable OIDC in Kubernetes clusters with Microsoft Entra ID.
Prerequisites
-
Palette or Palette VerteX version 4.0.X or greater.
-
For Microsoft Entra ID to work correctly with Palette, you must enable HTTPS and configure TLS.
-
OIDC configured in Palette with Microsoft Entra ID. Refer to the Enable OIDC SSO in Palette section for detailed guidance on how to configure OIDC in Palette.
-
Install kubelogin your local workstation.
Create Cluster Profile With RoleBindings
This section describes how to enable Entra ID SSO authentication to access a Kubernetes cluster.
-
Log in to Palette as a Tenant Admin.
-
Navigate to the left main menu and select Profiles.
-
Create a new cluster profile of the type Full. Select an OS, and proceed to the Kubernetes selection step.
-
Choose the Kubernetes layer and click on Values to modify the pack YAML values.
-
Navigate to the
kubeadminconfig.apiServer.extraArgssection of the pack layer. Modify the following parameters:Parameter Description oidc-username-claim The claim to use as the user name. This is the claim that will be used to identify the user in Kubernetes oidc-groups-claim The claim to use as the user's group membership. This is the claim that will be used to identify the user's group membership in Kubernetes oidc-issuer-url The URL of the OIDC provider oidc-client-id The client ID for the OIDC provider. This is the client ID that will be used to authenticate to the OIDC provider kubeadminconfig:
apiServer:
extraArgs:
oidc-groups-claim: "groups"
oidc-username-claim: "email"
oidc-issuer-url: "https://sts.windows.net/************"
oidc-client-id: "**************" -
Next, find the
clientConfigsection and modify the following parameters with the values you saved when you created the Azure Entra ID application.Parameter Description oidc-issuer-url The URL of the OIDC provider oidc-client-id The client ID for the OIDC provider. This is the client ID that will be used to authenticate to the OIDC provider oidc-client-secret The client secret for the OIDC provider. This is the client secret that will be used to authenticate to the OIDC provider oidc-extra-scope The scope tags clientConfig:
oidc-issuer-url: "{{ .spectro.pack.kubernetes.kubeadmconfig.apiServer.extraArgs.oidc-issuer-url }}"
oidc-client-id: "{{ .spectro.pack.kubernetes.kubeadmconfig.apiServer.extraArgs.oidc-client-id }}"
oidc-client-secret: "**************************"
oidc-extra-scope: "profile,email" -
Complete the remaining steps to create the cluster profile. Once you have specified the container network interface and the storage container interface, select Add New Pack to add the RBAC addon pack.
-
Select the Spectro RBAC from the Public Repo or the Palette Registry.
-
Select the latest version and click on the Values button to modify the pack YAML values.
-
Navigate to the
clusterRoleBindingssection of the pack layer. For Entra ID integration with RBAC, edit your RBAC pack values to match the YAML snippet below. Alternatively, copy and paste the entire block to your RBAC pack and modify you inputs where appropriate. Replace all thenamefields that start with the valueINSERTwith the Entra groups' ID you created in Azure.pack:
spectrocloud.com/install-priority: "0"
charts:
spectro-rbac:
# Specify one or more ClusterRoleBinding
# Note that the _name_ attribute is optional
clusterRoleBindings:
- role: cluster-admin
name: bind-cluster-admin-role-to-cluster-admin
subjects:
#- type: User
#name: user5
- type: Group
# For "name", input the - Entra ID Group ID name and add a comment on what the - Entra ID displayname is that corresponds to the - Entra ID Group Name
# Example: - Entra ID Group Object Id "70d19fd6-####-####-####-##c6c915e301" is tied to the - Entra ID Security Group with the display name of "cluster-admin-role".
# name: "- Entra ID GROUP ID NAME"
name: "INSERT - Entra ID GROUP ID For Cluster Admins"
- role: admin
name: bind-admin-role-to-admin
subjects:
#- type: User
#name: user5
- type: Group
# For "name", input the - Entra ID Group ID name and add a comment on what the - Entra ID displayname is that corresponds to the - Entra ID Group Name
# Example: - Entra ID Group Object Id "064f2e40-####-####-####-##b9f7927976" is tied to the - Entra ID Security Group with the display name of "admin-role".
# name: "- Entra ID GROUP ID NAME"
name: "INSERT - Entra ID GROUP ID For Admins"
- role: view
name: bind-view-role-to-view
subjects:
#- type: User
#name: user6
- type: Group
# For "name", input the - Entra ID Group ID name and add a comment on what the - Entra ID displayname is that corresponds to the - Entra ID Group Name
# Example: - Entra ID Group Object Id "732edc96--####-####-####-##851dee3380" is tied to the - Entra ID Security Group with the display name of "view-role".
# name: "- Entra ID GROUP ID NAME"
name: "INSERT - Entra ID GROUP ID For Viewers"
#- type: ServiceAccount
#name: group6
#namespace: foo
- role: edit
name: bind-edit-role-to-edit
subjects:
#- type: User
#name: user6
- type: Group
# For "name", input the - Entra ID Group ID name and add a comment on what the - Entra ID displayname is that corresponds to the - Entra ID Group Name
# Example: - Entra ID Group Object Id "21b55c08-6-####-####-####-##a3e2245ad7" is tied to the - Entra ID Security Group with the display name of "edit-role".
# name: "- Entra ID GROUP ID NAME"
name: "INSERT - Entra ID GROUP ID For Edit"
#- type: ServiceAccount
#name: group6
#namespace: foo
#namespaces:
# Specify one or more RoleBindings
#- namespace: team1
#createNamespace: true
#roleBindings:
#- role: admin
#name: special-override-name-admin-role
#kind: ClusterRole
#subjects:
#- type: User
#name: user3
#- type: Group
#name: team1namespaceadmin
#- role: view
#kind: ClusterRole
#subjects:
#- type: User
#name: user4
#- type: Group
#name: team1namespaceview
#- namespace: team2
#createNamespace: true
#roleBindings:
#- role: admin
#name: special
#kind: ClusterRole
#subjects:
#- type: User
#name: user1
#- type: Group
#name: group1You are matching the out-of-the-box Kubernetes roles cluster-admin, admin, view, and edit to the Entra ID groups you created in the previous steps. Members of the Entra ID group will be assigned the corresponding Kubernetes role. For example, members of the Entra ID group
k8s_cluster_adminswill be assigned the Kubernetes rolecluster-admin. You can change the YAML and use roleBindings to assign roles to specific namespaces versus using a clusterRoleBinding to assign roles to the entire cluster. -
Click on Confirm & Create to proceed with the cluster profile creation. Click on Next to proceed to the Review step.
-
Review the cluster profile settings and click on Finish Configuration to create the cluster profile.
You now have a cluster profile that will use Entra ID SSO authentication to access a Kubernetes cluster. You can now create a cluster using this profile. You will be redirected to the Entra ID login page when you log in to the cluster. Depending on your organization's SSO settings, this could be a simple login form or require MFA (Multi-Factor Authentication).
Validate
You can validate the Entra ID SSO integration by deploying a Kubernetes cluster with the cluster profile you created in the previous steps. Once the cluster is deployed, you can log in to the cluster by using kubectl with the kubelogin plugin from a workstation that has kubelogin installed.
-
Log in to Palette as a user who is a member of one of the Entra ID groups you created in the previous steps.
-
Navigate to the left main menu and select Clusters.
-
Deploy a cluster using the cluster profile you created in the previous steps. Check out the Getting Started tutorials for detailed guidance on how to deploy a cluster.
-
Once the cluster is deployed, select the cluster from the cluster list view to access the cluster details page.
-
Download the kubeconfig file for the cluster.
-
Configure kubectl to use the kubeconfig file you downloaded in the previous step. Refer to the Configure kubectl documentation for detailed guidance on how to configure kubectl.
-
Issue a kubectl command to access the cluster. For example, you can issue the following command to view the nodes in the cluster.
kubectl get pods --all-namespaces -
You will be redirected to the Entra ID login page. Depending on your organization's SSO settings, this could be a simple login form or require Multi-Factor Authentication.
-
Once you have successfully authenticated, you will be redirected back to the terminal and the kubectl command will be issued.
A list of pods in the cluster will be displayed if everything is configured correctly. If you are not able to access the cluster, check the kubeconfig file to ensure the OIDC configuration is correct. Also, make sure you have kubelogin installed on your workstation. Refer to the Configure kubectl documentation for detailed guidance on how to configure kubectl.