Deploy Cluster with Profile Variables
Cluster profile variables allow you to provide profile-layer specific configurations. This capability provides you the ability to reuse a profile version for many different deployments while using unique specifications.
In many ways, this treats the cluster profile as a template that can be used and reused for Day-2 operations. It is important to consider the type of variable you create and use, and its context in the packs it is applied against. Some variables can be applied while a cluster is running; others may only be relevant when the cluster is deployed; and some may not be good candidates due to strict restrictions on the value. Refer to the Limitations section for further information on cluster profile variable definition.
In this tutorial, you will learn how to use cluster profile variables with workload clusters through both Palette's UI and Terraform workflows. While the tutorial demonstrates the workflow using Amazon Web Services (AWS), you can also use the same steps with Microsoft Azure or Google Cloud Platform (GCP).
Prerequisites
- A Palette account.
- A Palette API key if you choose to follow along using the Terraform workflow. Refer to the Create a Palette API Key guide for further instructions.
- A public cloud account registered in Palette. Refer to AWS, Azure or Google Cloud to learn how to register a cloud account.
- An SSH key available in the region where you plan to deploy the cluster.
- Ensure that the Palette Community Registry is available in your Palette environment. Refer to the Add OCI Packs Registry guide for additional guidance.
- Docker Desktop or Podman installed if you choose to follow along using the tutorial container.
- Basic knowledge of containers and Kubernetes manifest file attributes. Refer to the Docker Get Started guide and the Learn Kubernetes Basics tutorial to start learning.
- Kubectl installed locally. Use the Kubernetes Install Tools for additional guidance.
Cluster Profile Variables (UI Workflow)
In this part of the tutorial, you will use Palette's UI to create your cluster and cluster profile. The cluster profile will have two versions as part of it. The 1.0.0 version will be a clean, default version without cluster profile variables, while the 1.1.0 version will have the variables added to it.
Create Cluster Profile
Log in to Palette, select Profiles from the left main menu, and click Add Cluster Profile.
Assign the cluster profile a name and leave the default value for the version. Click Next to continue.
In the Profile Layers section, configure your profile with the following packs.
- AWS
- Azure
- GCP
| Pack | Version | Registry |
|---|---|---|
| Ubuntu | 22.04.x | Palette Registry (OCI) |
| Palette eXtended Kubernetes | 1.30.x | Palette Registry (OCI) |
| Calico | 3.29.2 | Palette Registry (OCI) |
| Amazon EBS CSI | 1.41.x | Palette Registry (OCI) |
| WordPress | 6.4.3 | Palette Community Registry (OCI) |
| Pack | Version | Registry |
|---|---|---|
| Ubuntu | 22.04.x | Palette Registry (OCI) |
| Palette eXtended Kubernetes | 1.30.x | Palette Registry (OCI) |
| Calico | 3.29.2 | Palette Registry (OCI) |
| Azure Disk | 1.41.x | Palette Registry (OCI) |
| WordPress | 6.4.3 | Palette Community Registry (OCI) |
| Pack | Version | Registry |
|---|---|---|
| Ubuntu | 22.04.x | Palette Registry (OCI) |
| Palette eXtended Kubernetes | 1.30.x | Palette Registry (OCI) |
| Calico | 3.29.2 | Palette Registry (OCI) |
| GCE Persistent Disk CSI | 1.41.x | Palette Registry (OCI) |
| WordPress | 6.4.3 | Palette Community Registry (OCI) |
After adding the packs to your cluster profile, click Confirm & Create.
Click Next. Then, click Finish Configuration to create the 1.0.0 cluster profile version.
Add Cluster Profile Variables
Cluster profile versioning provides better change visibility and control over the layers in your host clusters. Refer to the Version a Cluster Profile guide to learn more about cluster profile versioning.
To create a new cluster profile version, click on Profiles in the left main menu and select your cluster profile.
From the drop-down menu next to the cluster profile name, select Create new version.
Provide the version number 1.1.0 and click Confirm. A versioning successful message displays. Select
{}Variables. Next, select {} Create variable.
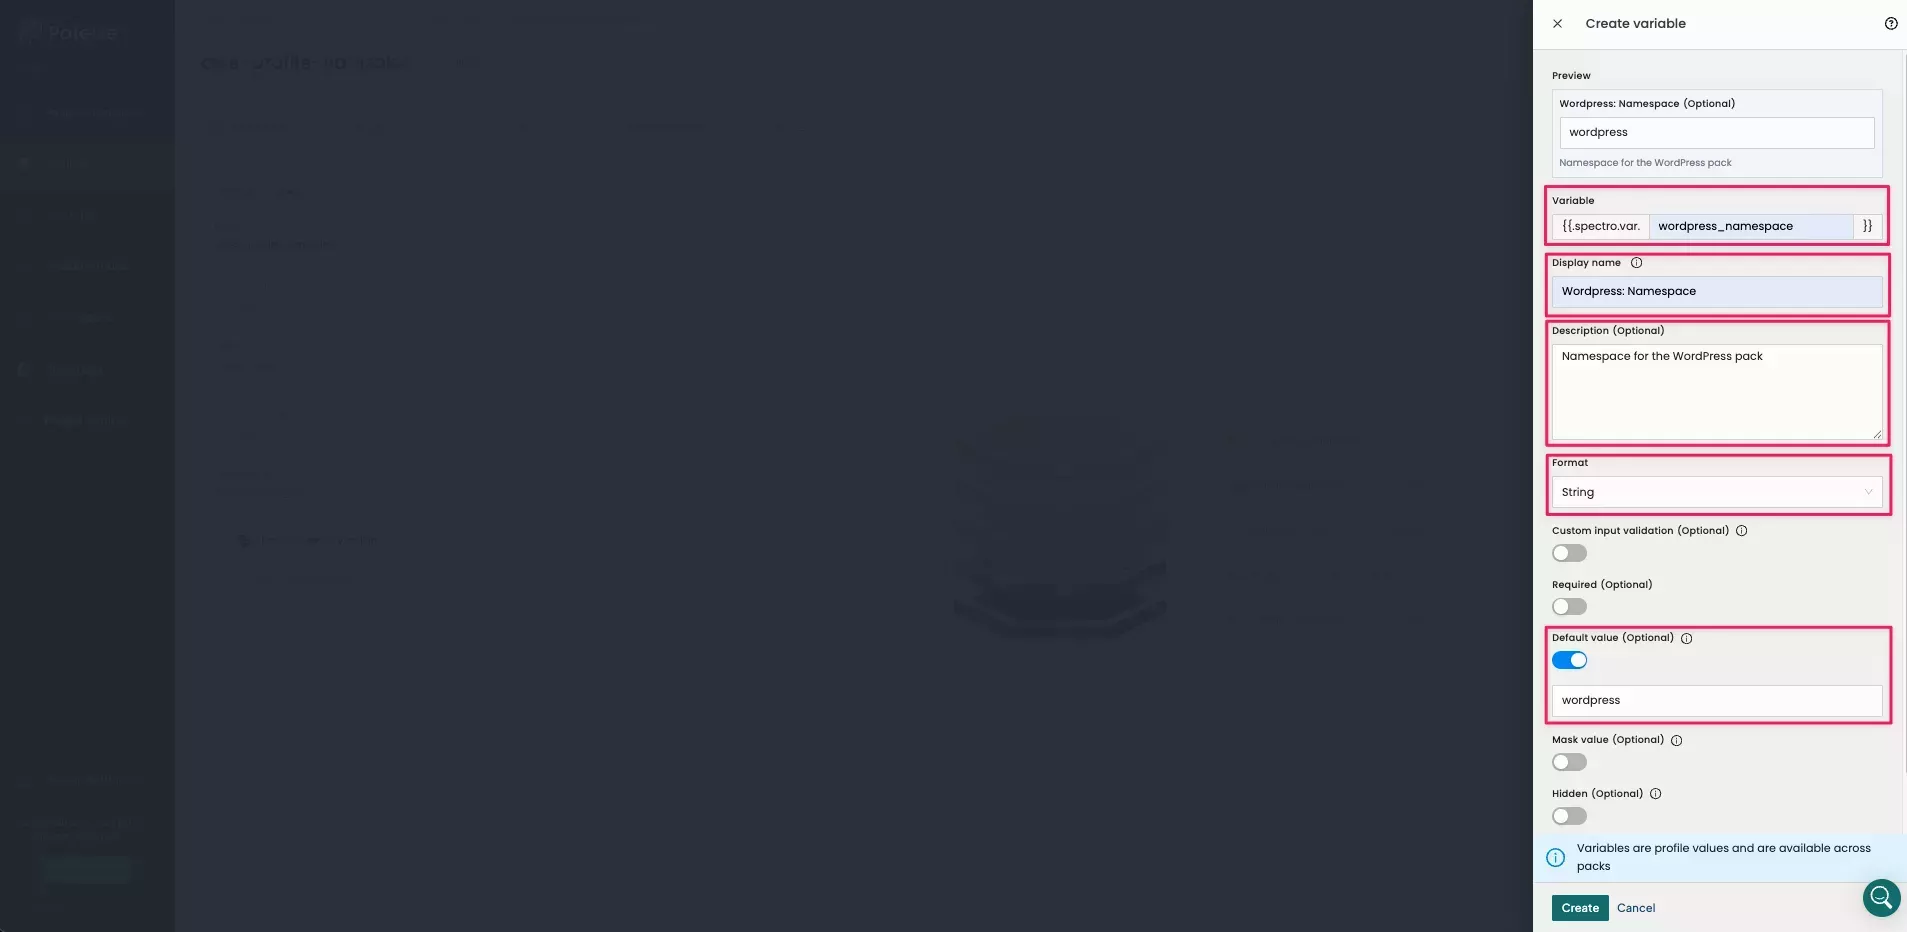
On the Create variable page, fill in the following information.
| Variable Setting | Value |
|---|---|
| Variable | wordpress_namespace |
| Display name | WordPress: Namespace |
| Description | Namespace for the WordPress pack |
| Format | Select String from the drop-down. |
| Default value | Enable the option and enter wordpress. |
Click Create to create the cluster profile variable.
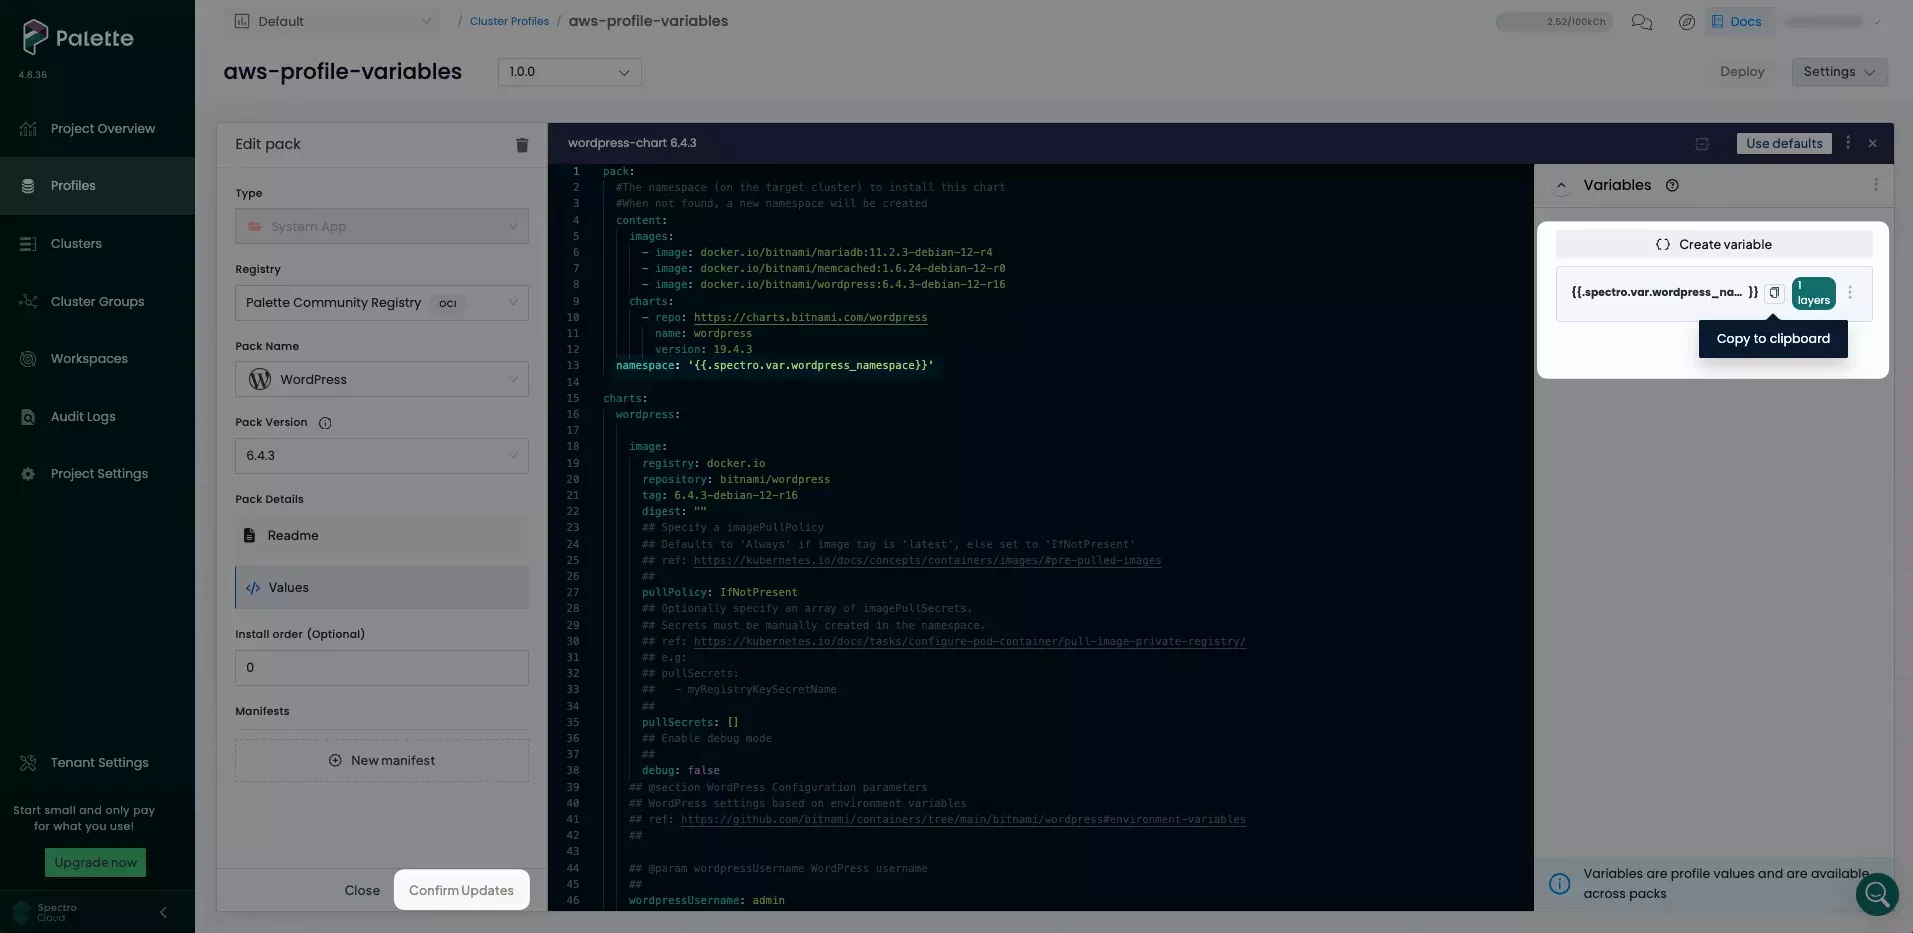
You can now add the created cluster profile variable to the cluster profile. Click the Copy to clipboard icon and close the Profile variables tab.
You must add the variable to the pack manifest YAML file in order to use it. Click on the WordPress pack, and select the Values button to open the editor. Paste the variable to replace the default namespace value.
Click Confirm Updates, and then click Save Changes. This will make the variable part of the cluster profile.
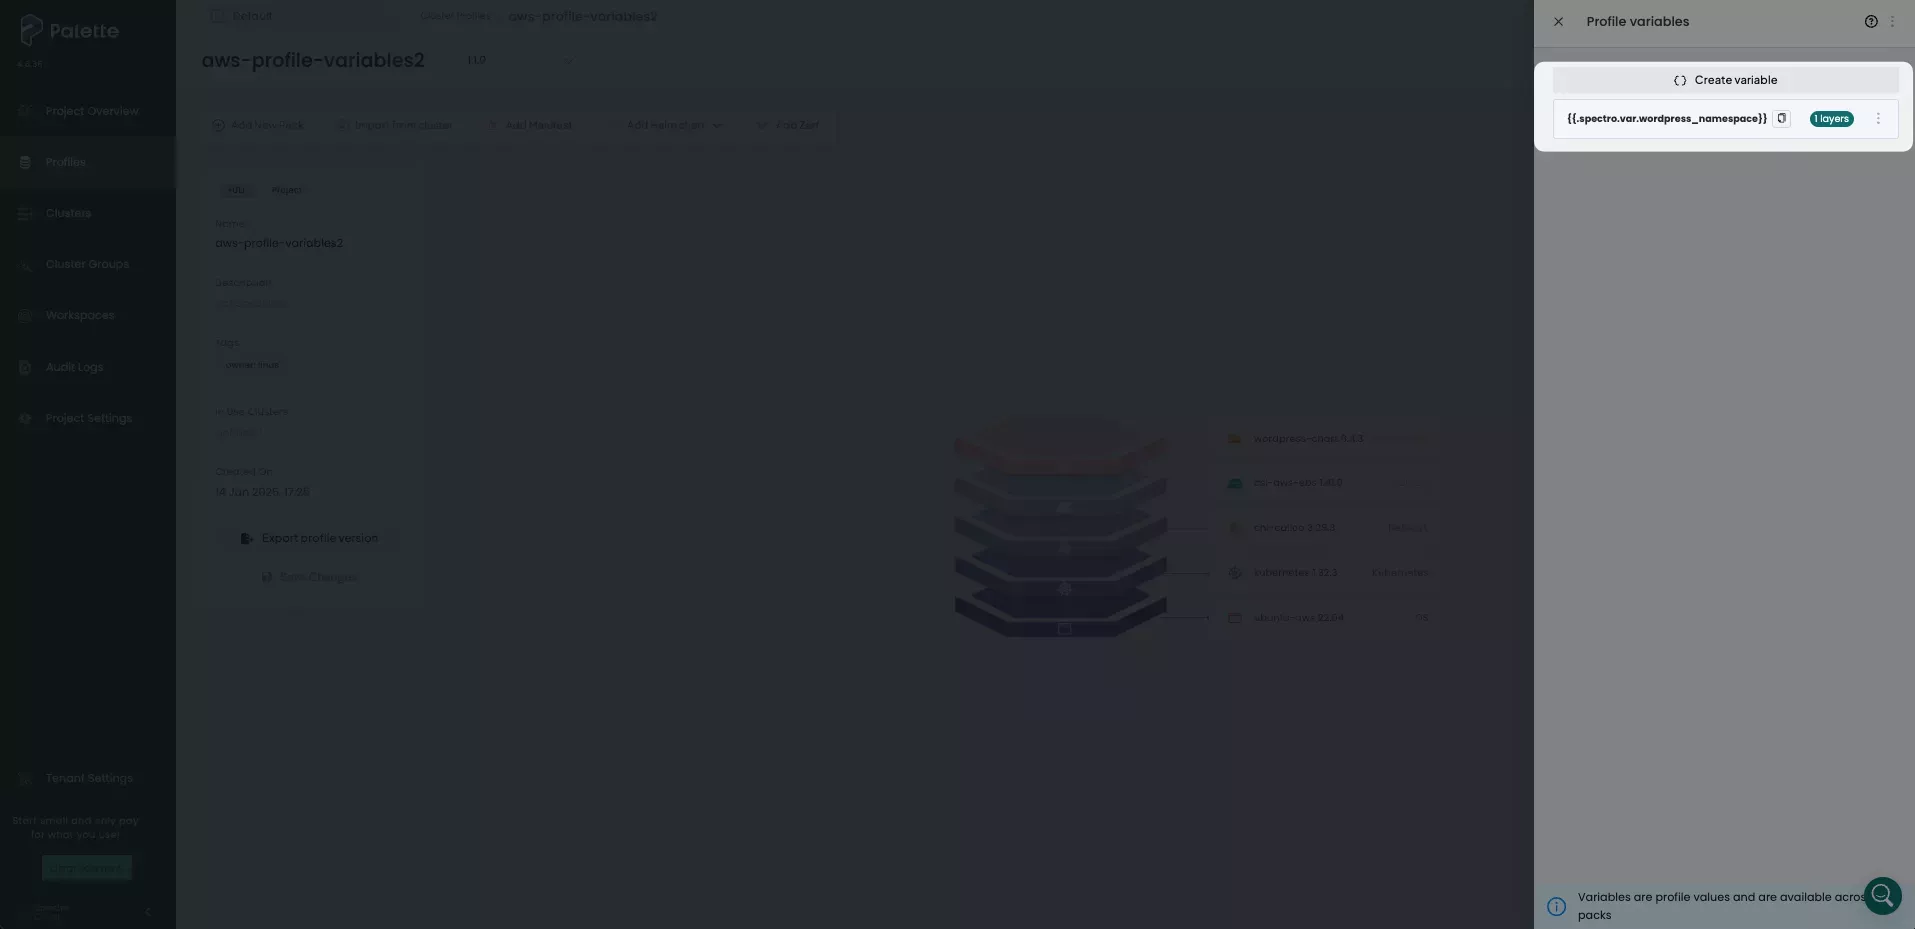
As shown in the following image, the namespace variable is displayed as in use in one layer, corresponding to the WordPress pack.
Next, select Create variable to add the remaining variables. Add the following variables and their default values to the new version of the cluster profile. After each variable, ensure you click Create.
Variable: wordpress_replica
| Variable Setting | Value |
|---|---|
| Variable | wordpress_replica |
| Display name | WordPress: Replica Count |
| Description | Number of replicas for the WordPress app |
| Format | Select Number from the drop-down. |
| Default value | Enable the option and enter 1. |
Variable: wordpress_port
| Variable Setting | Value |
|---|---|
| Variable | wordpress_port |
| Display name | WordPress: New HTTP WordPress port |
| Description | New port for WordPress HTTP |
| Format | Select Number from drop-down. |
| Default value | Enable the option and enter 80. |
Now that your variables are created, add them to the WordPress manifest YAML using the same steps as you used for
{{.spectro.var.wordpress_namespace}}. For each variable, copy it to the clipboard and add it to the line location as
noted in the following table.
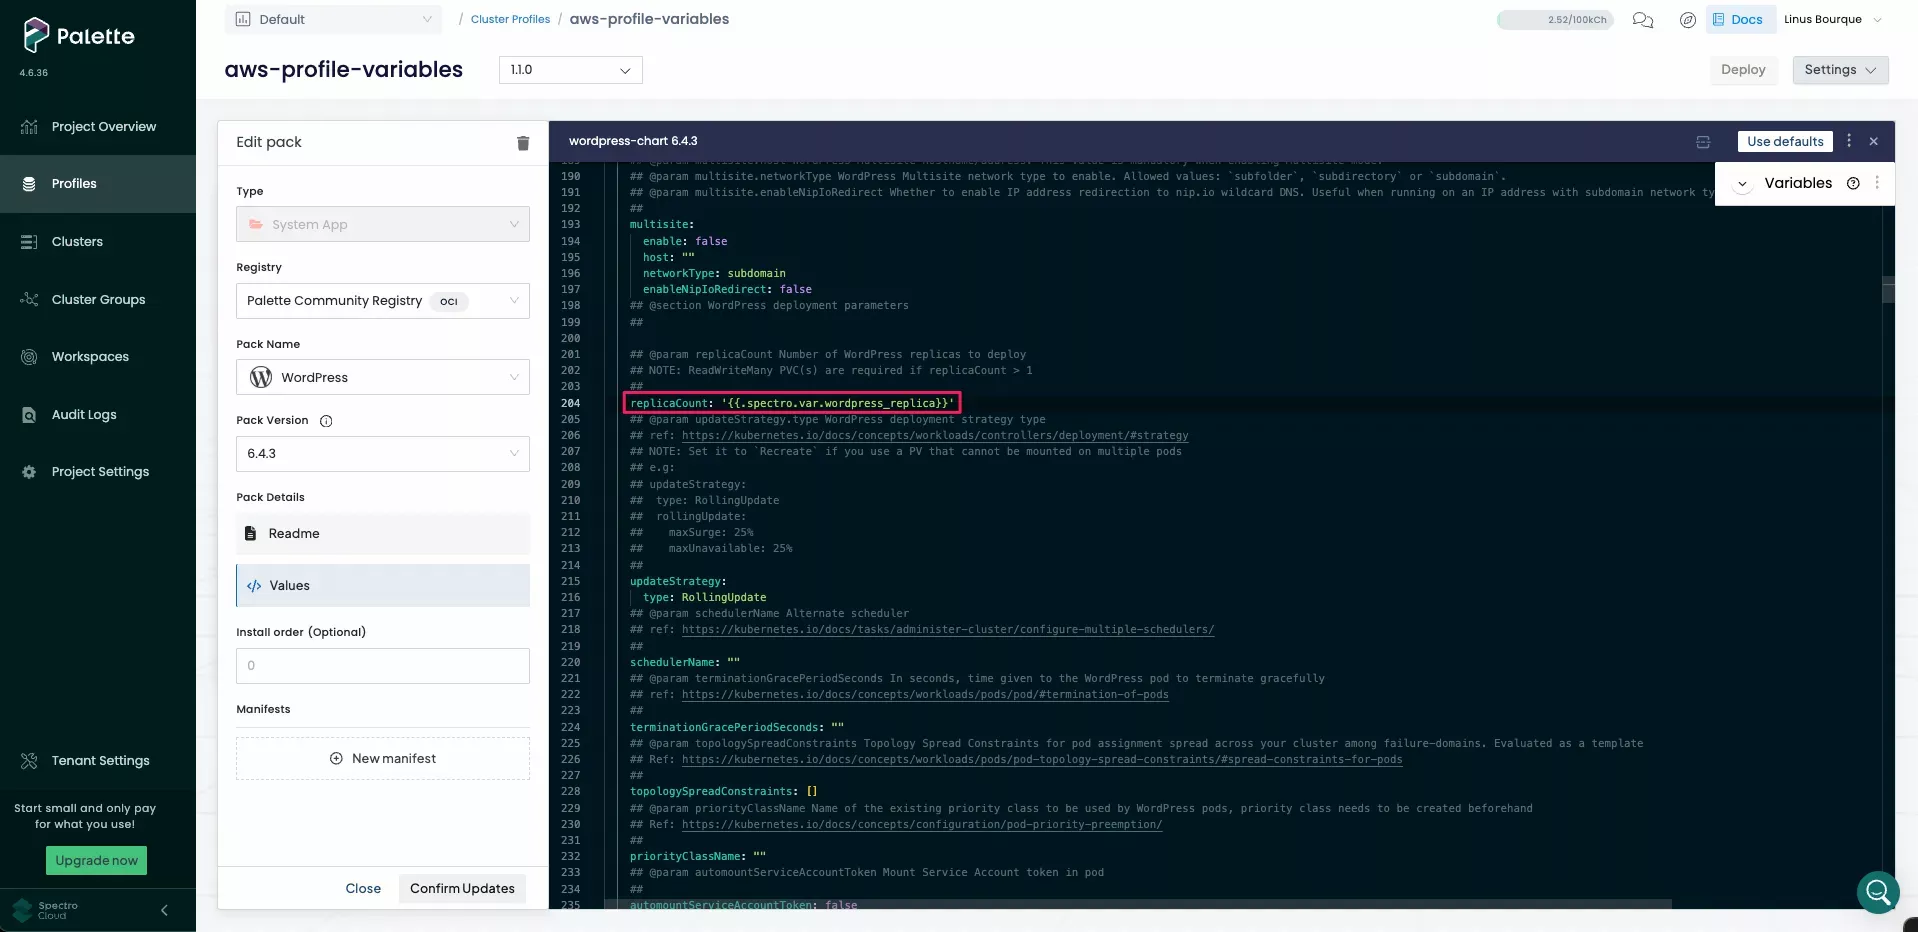
Paste '{{.spectro.var.wordpress_replica}}' to the value of the charts.wordpress.replicaCount resource.
Next, paste '{{.spectro.var.wordpress_port}}' to the value of the charts.wordpress.service.ports.http resource.

Click Confirm Updates and Save Changes to add the new variables to the WordPress pack.
Deploy Cluster with Cluster Profile Variables
Your cluster profile now has two versions, one without variables and one with variables. You could either deploy two separate clusters, one for each version, or deploy one cluster using version 1.0.0 and then upgrade it to version 1.1.0. This tutorial demonstrates the latter option.
In Palette, select your profile and ensure the drop-down menu is set to version 1.0.0 . Select Deploy to deploy the cluster. Check out the Deploy a Cluster tutorial for guidance on how to deploy a cluster. The cluster deployment process can take 15 to 30 minutes. You can use either the Palette UI or the kubectl tool to verify that the deployment was successful.
- Access Cluster with CLI
- Palette UI
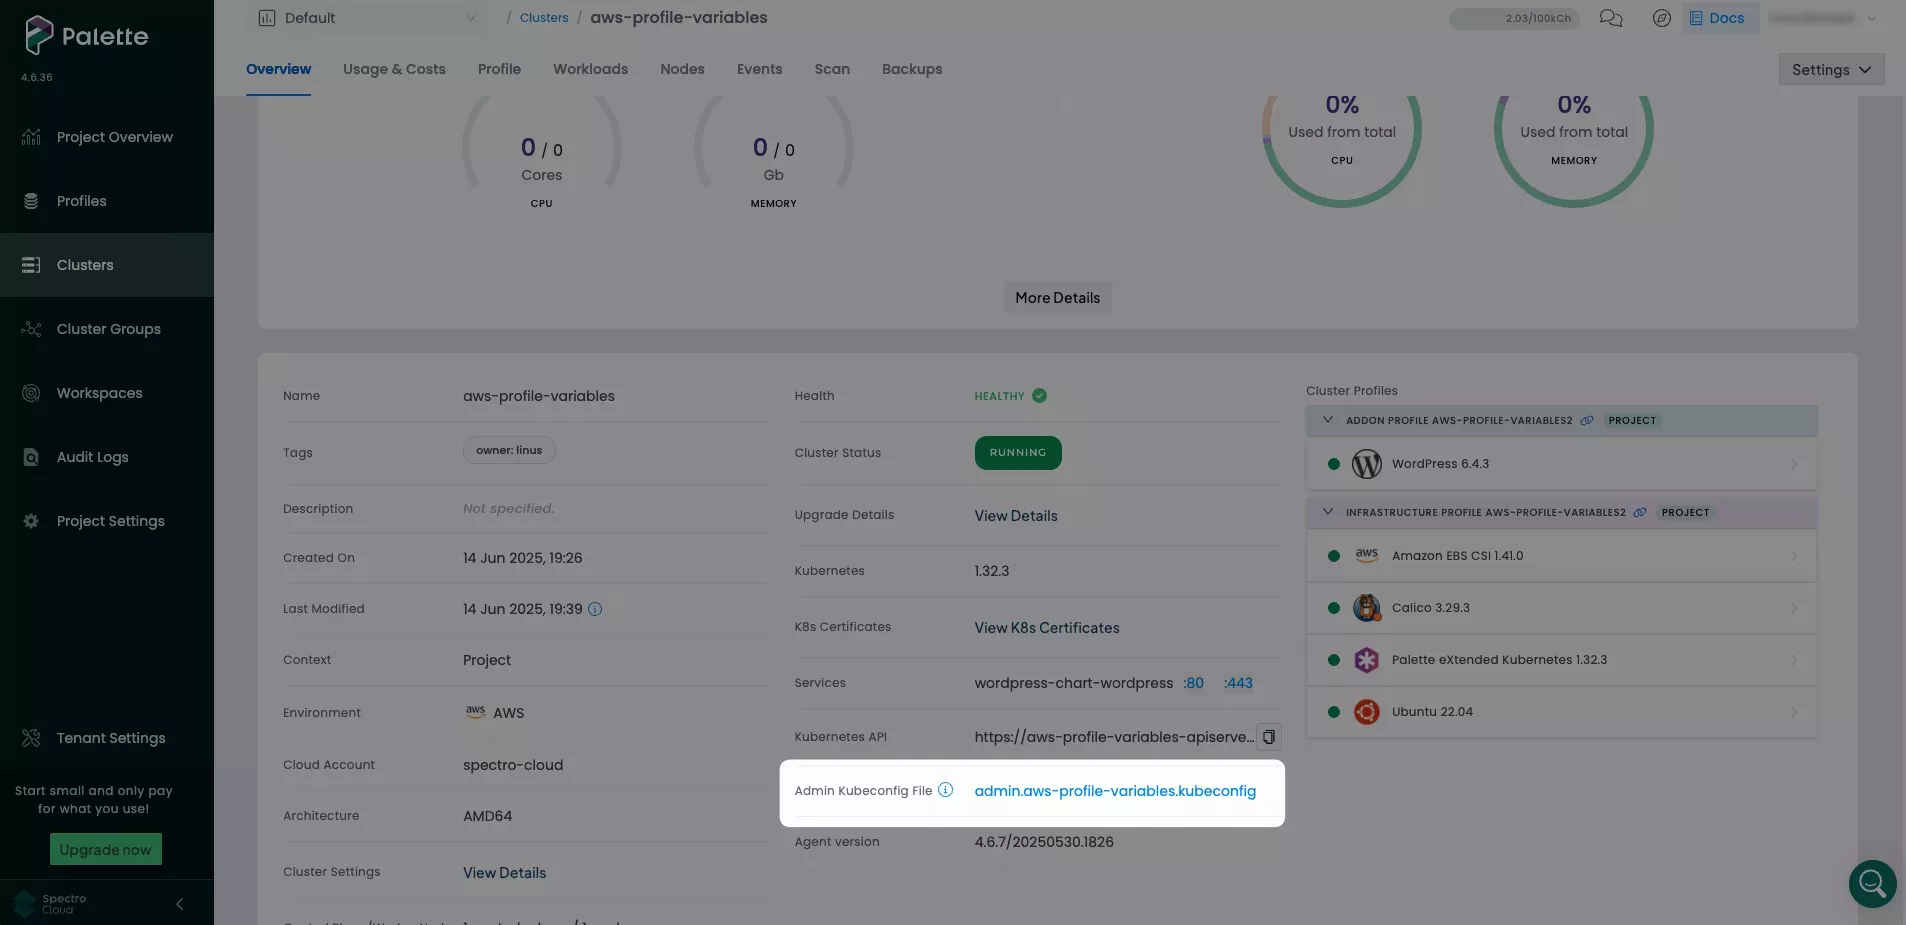
From the left main menu, select Clusters. Then, select the cluster you created in this tutorial. Select the Overview tab, navigate to the middle column containing cluster details and locate the Kubernetes Config File row.
Click on the Admin Kubeconfig File link to download the file.
Open a terminal window and set the KUBECONFIG environment variable to the file path of the kubeconfig file.
export KUBECONFIG=~/Downloads/admin.aws-profile-variables.kubeconfig
Use the following command to get a listing of the default pod deployment for the Wordpress app. Three pods are displayed similar to the following output: one for MariaDB, one for WordPress database memory cache and one for the WordPress web server. The row highlighted in the output is an example of the Wordpress web server.
kubectl get pods --namespace wordpress
NAME                                                   READY   STATUS    RESTARTS   AGE
wordpress-chart-wordpress-dd7d944cb-vwd6c              1/1     Running   0          6m44s
wordpress-chart-wordpress-mariadb-0                    1/1     Running   0          6m44s
wordpress-chart-wordpress-memcached-56cffcf458-7hw6d   1/1     Running   0          6m44s
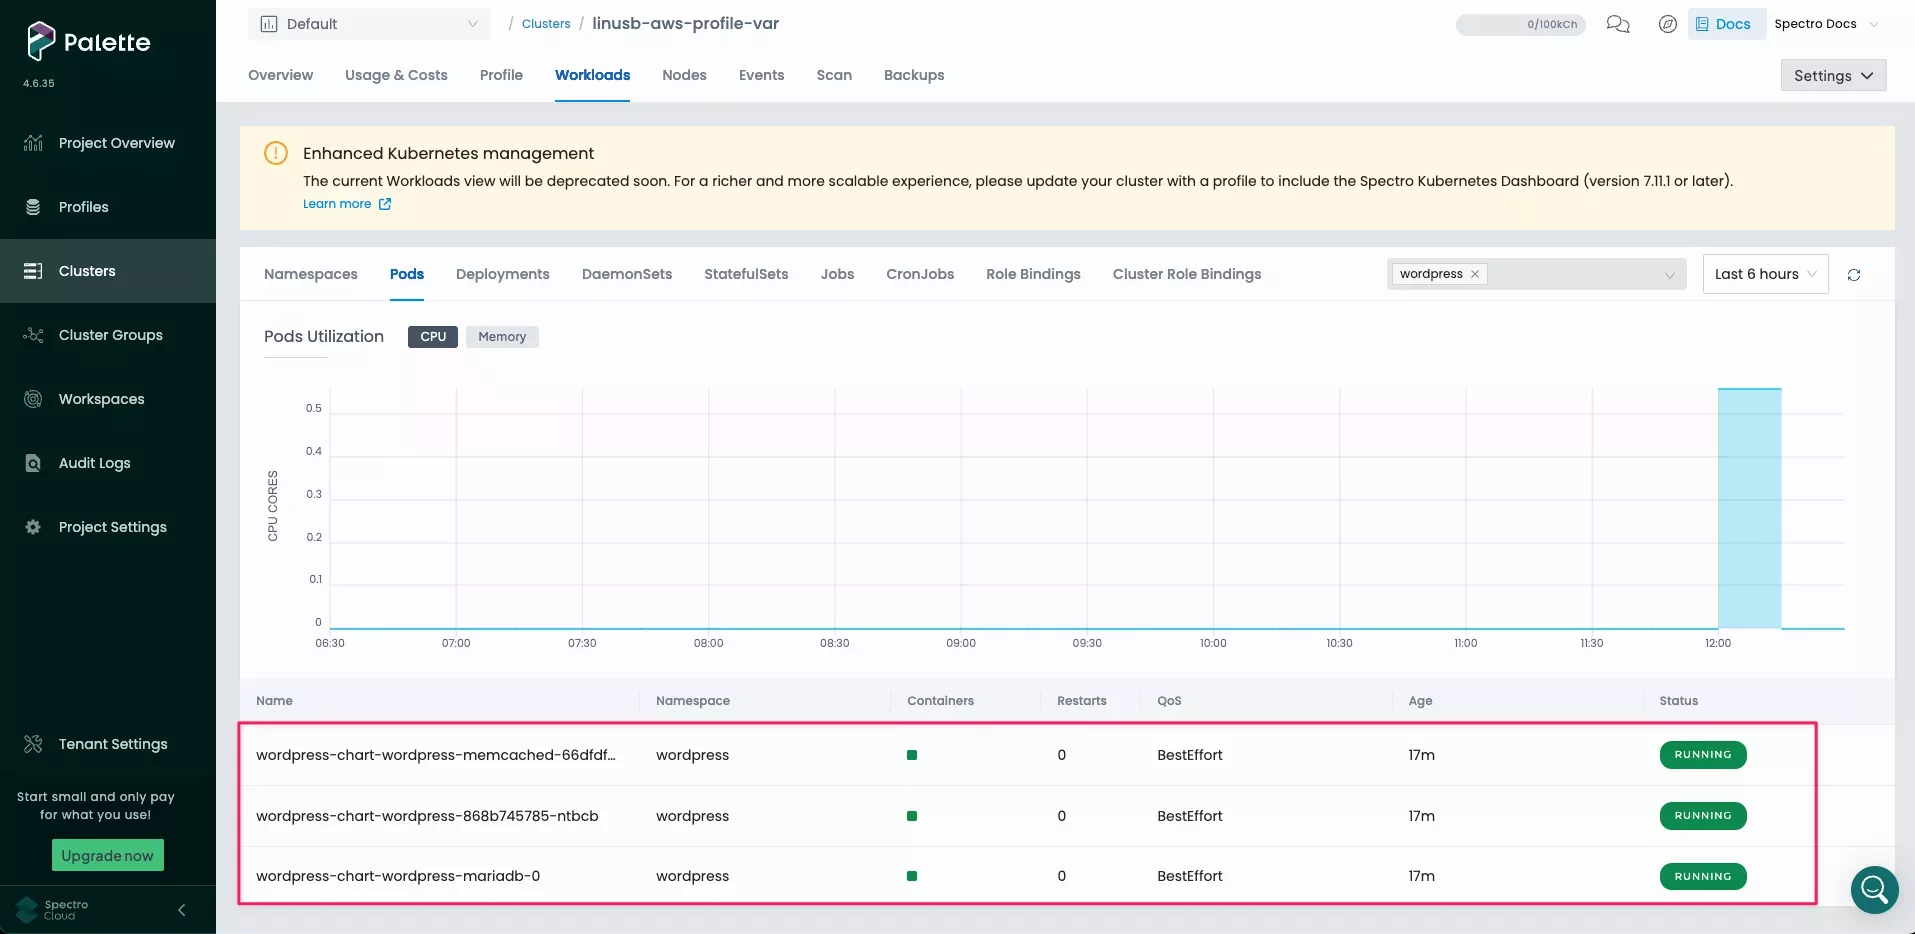
Select your cluster once it is deployed and then navigate to the Workloads tab. Then, select Pods and filter for wordpress. Three pods are displayed similar to the following screenshot: one for MariaDB, one for WordPress database memory cache, and one for the WordPress web server. This is the default deployment behavior for the WordPress pack.
Select the Overview tab to verify that the WordPress pack was deployed successfully. Click on the :80 port to
launch the default Wordpress application.

The default WordPress page will launch in a new browser tab.

Return to Palette, select your profile and use the drop-down menu to set the profile version to 1.1.0. Choose Review & Save. On the Changes Summary page, select Review changes in Editor.
Select Profile variables changes, open the Review Update Changes, and enter the following new values for each variable.
| Variable Name | New Value |
|---|---|
| WordPress: Replica Count | 3 |
| WordPress: HTTP Port | 9090 |
| WordPress: Namespace | new-wordpress-ns |
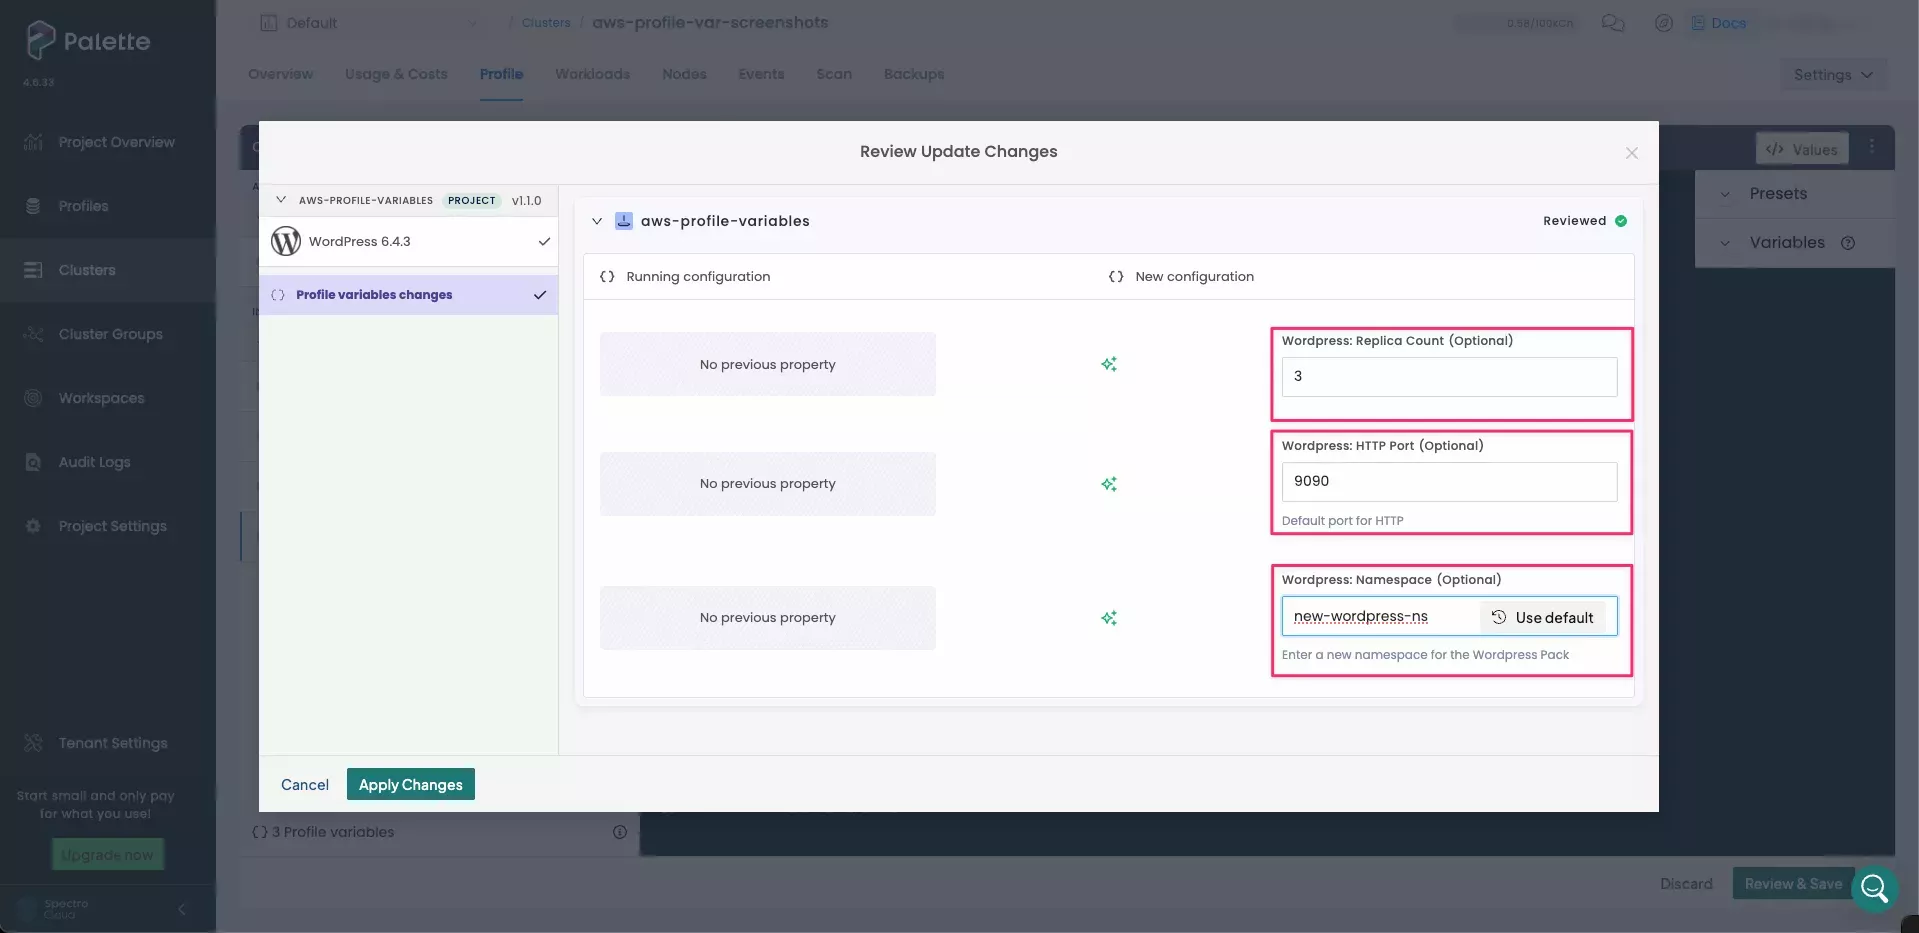
Click Apply Changes. Wait until the cluster completes the Addon deployment step. This process causes the cluster to create a new namespace and three new replicas for WordPress under the new namespace, without deleting the existing resources. It will also cause the WordPress application to open a new HTTP port.
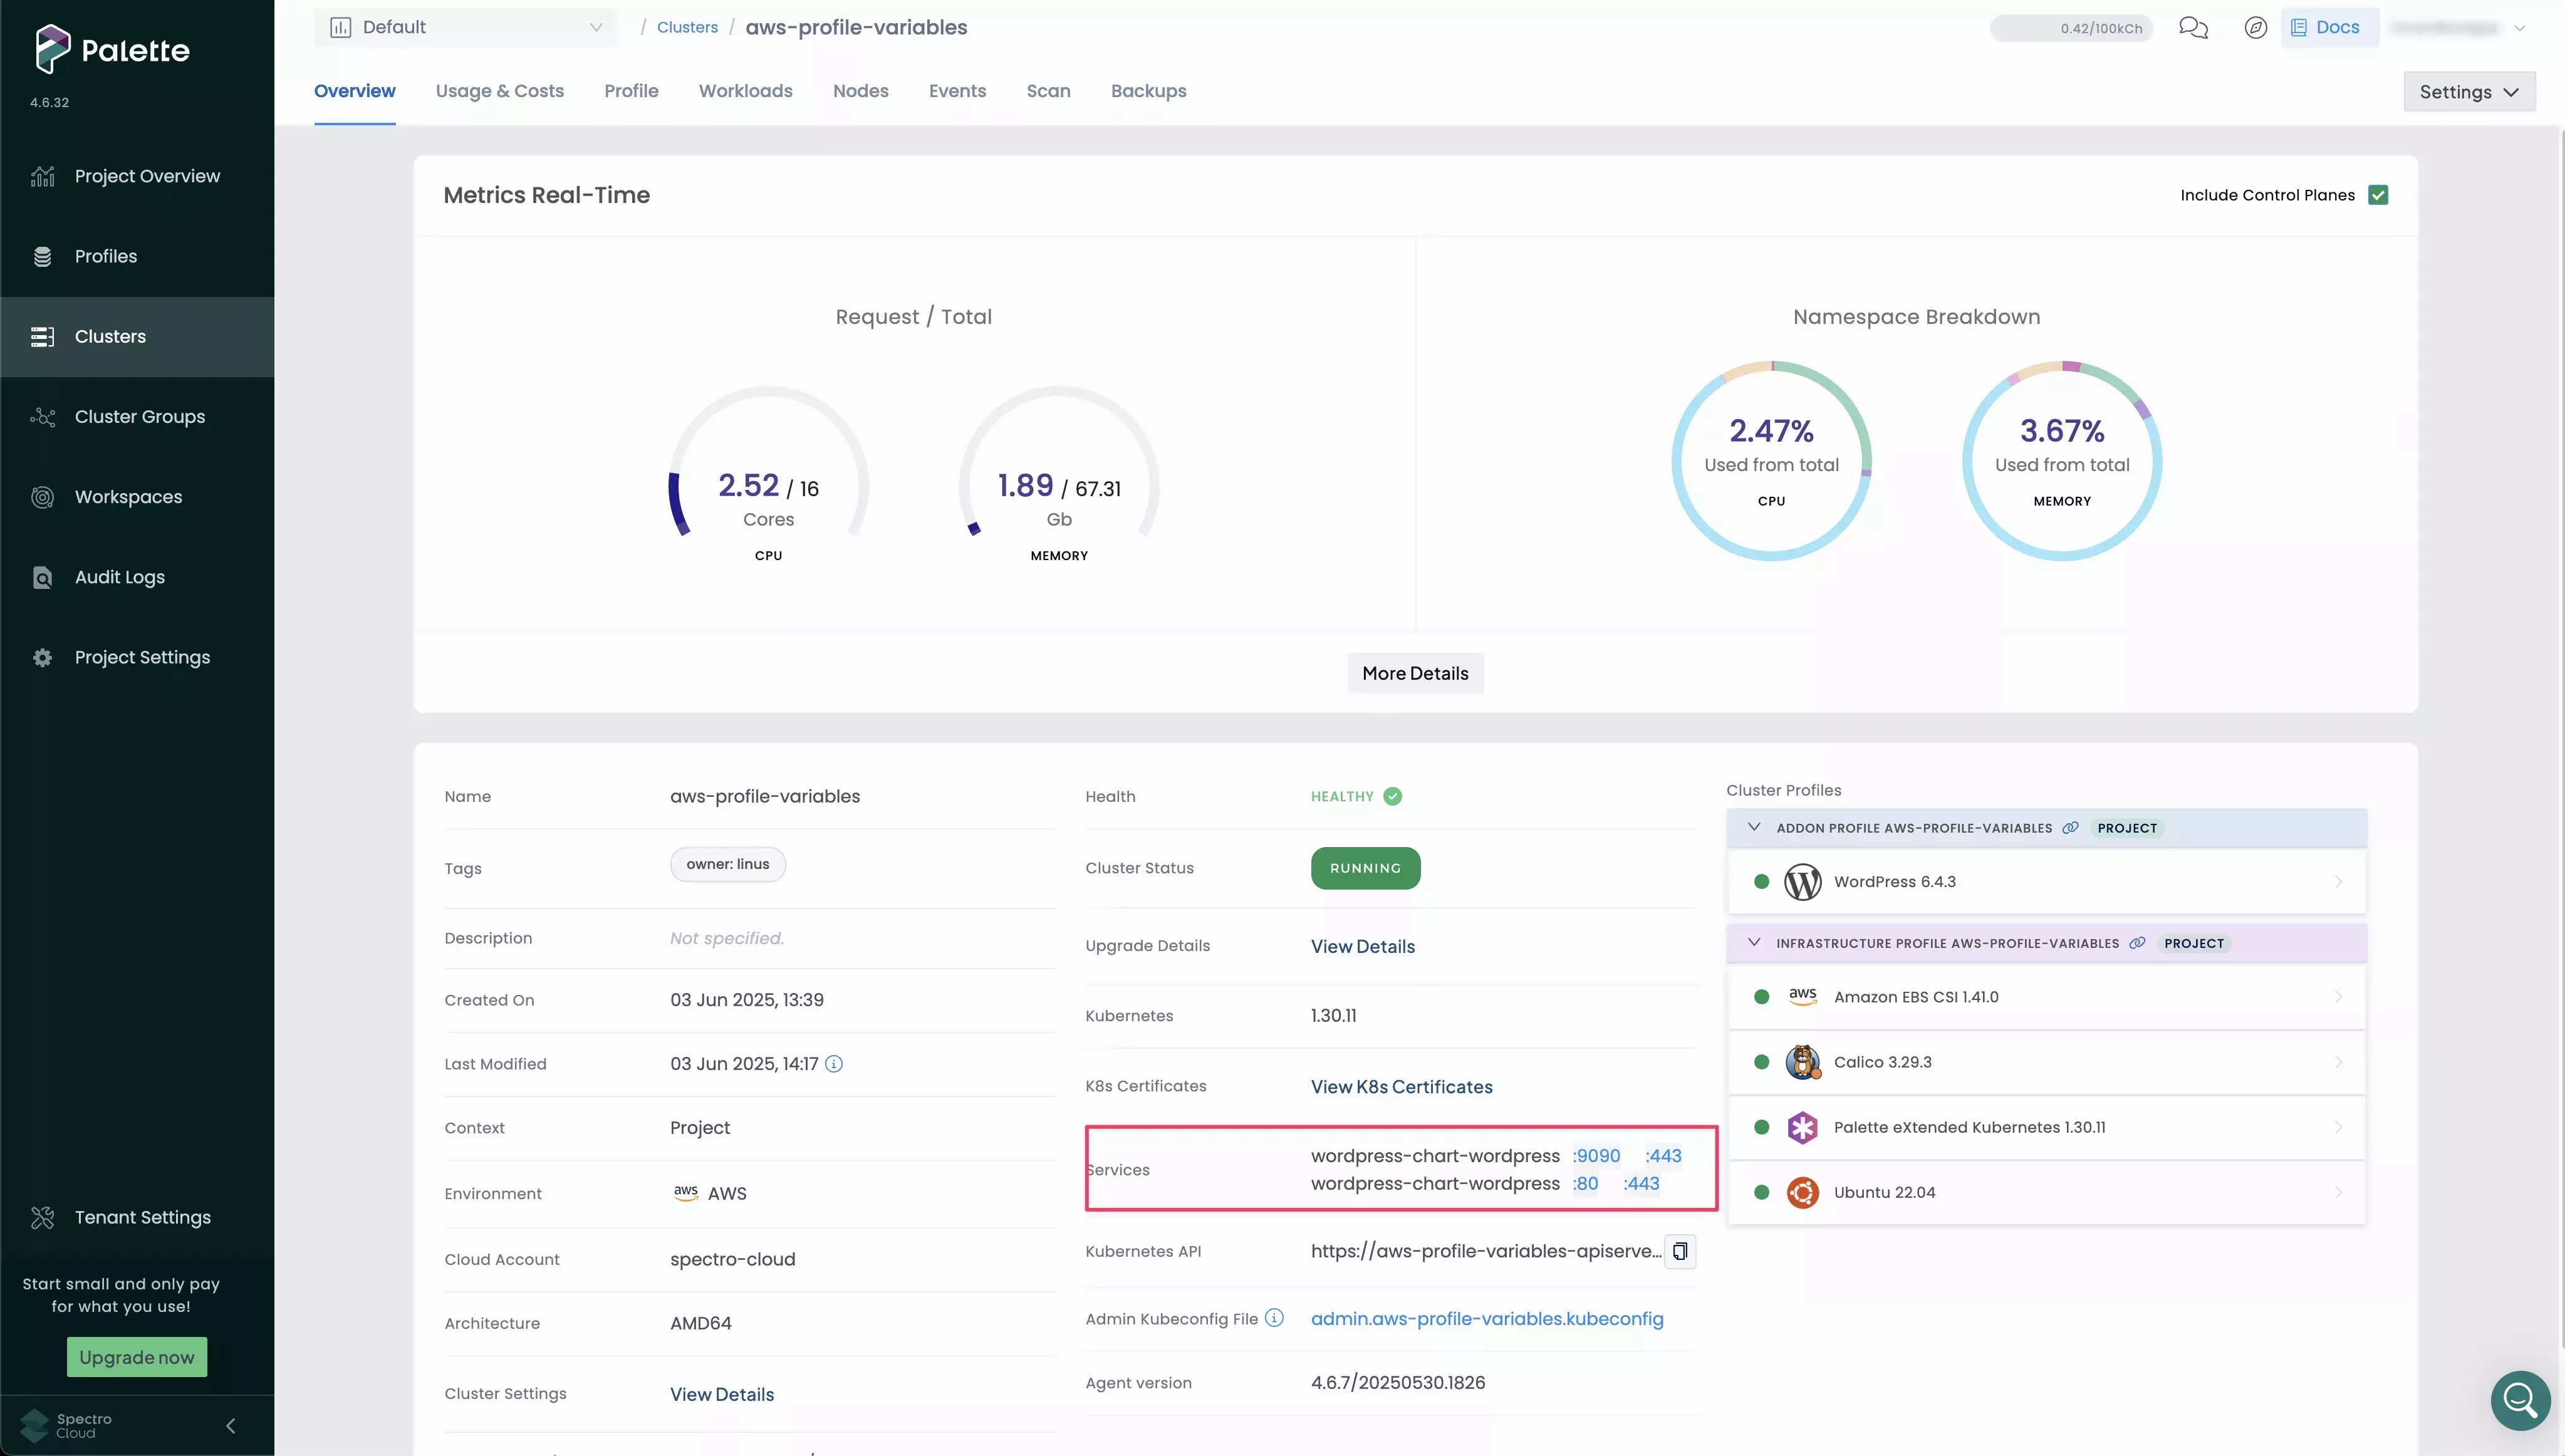
Select the Overview tab to verify that the WordPress pack was deployed successfully. Click on the :9090 port to
launch the default Wordpress application.
- Access Cluster with CLI
- Palette UI
Return to your terminal window.
Use the following command to get a listing of the default pod deployment for the Wordpress app. Five pods are displayed similar to the following output: one for MariaDB, one for WordPress database memory cache and three for the WordPress web server. The rows highlighted in the output are an example of the Wordpress web server.
kubectl get pods --namespace wordpress
NAME                                                   READY   STATUS    RESTARTS   AGE
wordpress-chart-wordpress-dd7d944cb-f2prh              0/1     Running   0          25s
wordpress-chart-wordpress-dd7d944cb-fdmwt              0/1     Running   0          25s
wordpress-chart-wordpress-dd7d944cb-n78rc              0/1     Running   0          25s
wordpress-chart-wordpress-mariadb-0                    0/1     Running   0          25s
wordpress-chart-wordpress-memcached-56cffcf458-hd9x6   1/1     Running   0          25s
Select the Workloads tab. Then, select Namespaces. Refresh the page.
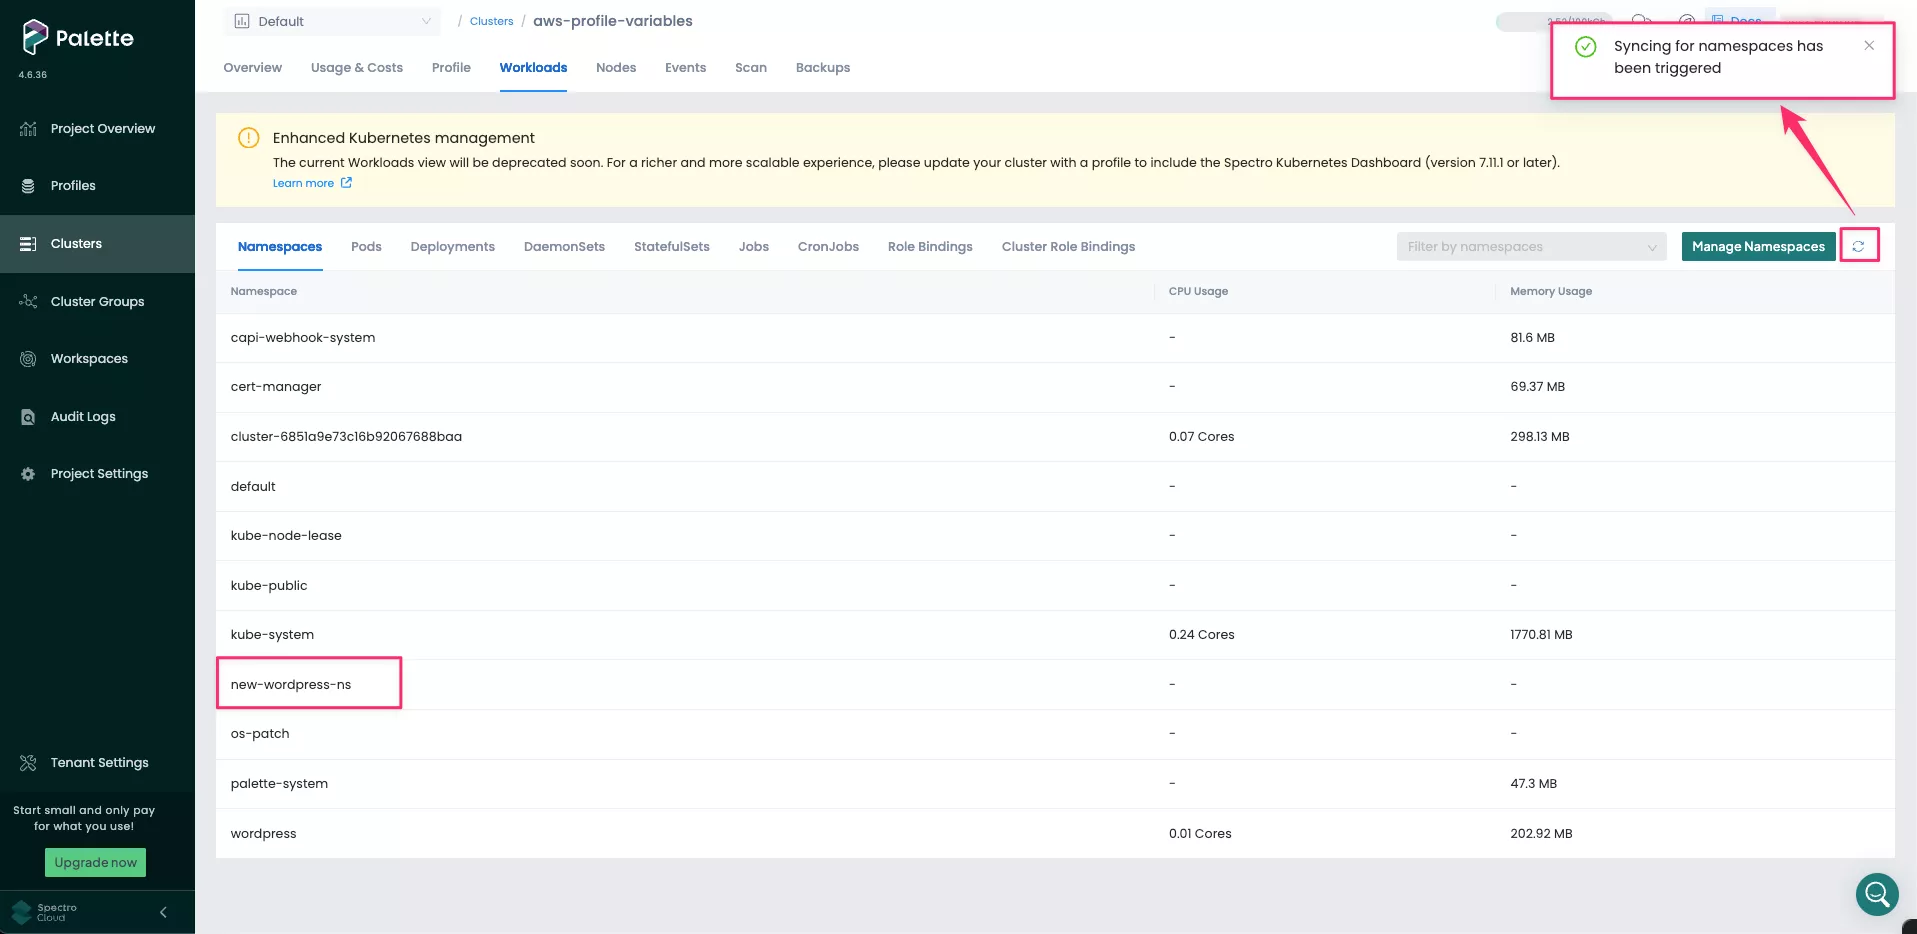
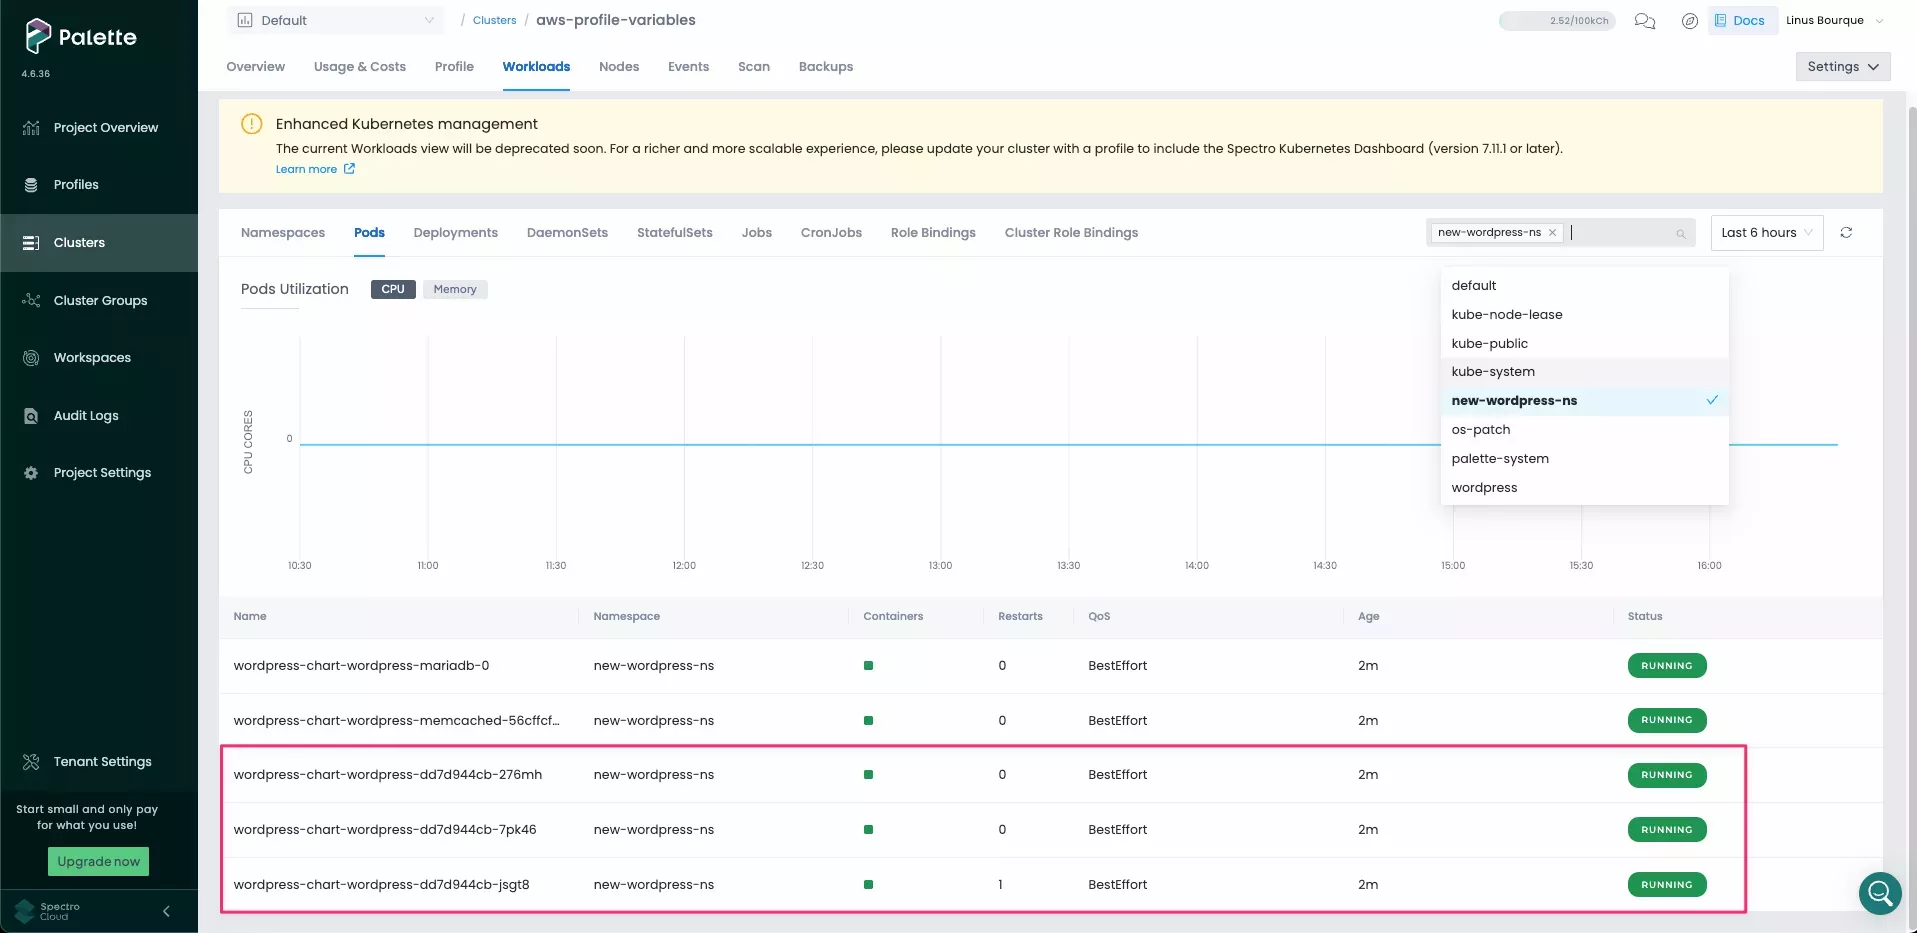
Select the Workloads tab. Then, select Pods. Refresh the page and then filter for new-wordpress-ns namespace.
Three additional WordPress web server pods appear in the new WordPress namespace, new-wordpress-ns.
Cleanup
Use the following steps to clean up the resources you created for the tutorial.
From the left main menu, select Clusters. Then, select the cluster you created in this tutorial.
Select Settings to expand the menu, and select Delete Cluster.
A dialog appears. Input the cluster name to confirm the delete action.
The deletion process takes several minutes to complete.
Once the cluster is deleted, select Profiles from the left main menu.
Select the cluster profile you created in this tutorial. Select the three-dot menu to display the Delete button.
Select Delete and confirm the selection to remove the cluster profile. Make sure you delete both versions of this profile.
Cluster Profile Variables (Terraform Workflow)
When you create cluster profiles in Terraform, the cluster profile variables can be defined in the profile versions that you want to apply the variables against.
You can clone the Tutorials repository locally or follow along by downloading a container image that includes the tutorial code and all dependencies.
- Docker
- Podman
- Git
Start Docker Desktop and ensure that the Docker daemon is available by issuing the following command.
docker ps
Next, download the tutorial image, start the container, and open a bash session into it.
docker run --name tutorialContainer --interactive --tty ghcr.io/spectrocloud/tutorials:1.3.0 bash
Do not exit the container until the tutorial is complete. Otherwise, you may lose your progress.
If you are not using a Linux operating system, create and start the Podman Machine in your local environment. Otherwise, skip this step.
podman machine init
podman machine start
Use the following command and ensure you receive an output displaying the installation information.
podman info
Next, download the tutorial image, start the container, and open a bash session into it.
podman run --name tutorialContainer --interactive --tty ghcr.io/spectrocloud/tutorials:1.3.0 bash
Do not exit the container until the tutorial is complete. Otherwise, you may lose your progress.
Open a terminal window and download the tutorial code from GitHub.
git clone https://github.com/spectrocloud/tutorials.git
Change the directory to the tutorial folder.
cd tutorials/
Check out the following git tag.
git checkout v1.3.0
Navigate to the folder that contains the tutorial code.
cd terraform/cluster-profile-variables-tf
Resources Review
To help you get started with Terraform, the tutorial code is structured to support deploying a cluster to either AWS, Azure, or GCP. Before you deploy a host cluster to AWS, review the following files in the folder structure.
| File | Description |
|---|---|
| provider.tf | This file contains the Terraform providers that are used to support the deployment of the cluster. |
| inputs.tf | This file contains all the Terraform variables required for the deployment logic. |
| data.tf | This file contains all the query resources that perform read actions. |
| cluster_profiles.tf | This file contains the cluster profile definitions for each cloud provider. |
| clusters.tf | This file has the cluster configurations required to deploy a host cluster to one of the cloud providers. |
| terraform.tfvars | Use this file to target a specific cloud provider and customize the deployment. This is the only file you must modify. |
| ssh-key.tf | This file has the SSH key resource definition required for Azure deployments. |
| outputs.tf | This file contains the content that will be displayed in the terminal after a successful Terraform apply action. |
| manifests/wordpress-default.yaml | This file contains the default configuration for the WordPress pack. |
| manifests/wordpress-variables.yaml | This file contains the configuration for the WordPress pack with cluster profile variables added. |
Open the cluster_profiles.tf file. In the AWS Cluster Profile v1.0.0, there are no variables defined and the
WordPress pack points to wordpress-default.yaml. This file is the default YAML configuration file for the WordPress
pack. Within the AWS Cluster Profile v1.1.0 code block, the WordPress pack points to wordpress-variables.yaml,
which references the cluster profile variables. Additionally, at the end of the code block, you will find the following
cluster profile variables that will be used.
profile_variables {
    variable {
      name          = "wordpress_replica"
      display_name  = "Number of replicas"
      format        = "number"
      description   = "The number of WordPress replicas to be deployed."
      default_value = var.wordpress_replica
      required      = true
    }
    variable {
      name          = "wordpress_namespace"
      display_name  = "WordPress: Namespace"
      format        = "string"
      description   = "The namespace for the WordPress pack."
      default_value = var.wordpress_namespace
      required      = true
    }
    variable {
      name          = "wordpress_port"
      display_name  = "WordPress: Port"
      format        = "number"
      description   = "The WordPress HTTP port."
      default_value = var.wordpress_port
      is_sensitive  = true
      required      = true
    }
  }
Review the two files in the manifests folder. wordpress-default.yaml contains the default configuration for the
WordPress Chart application and wordpress-variables.yaml has the following three variables defined in it.
For namespace: '{{ .spectro.var.wordpress_namespace }}', the variable was added to pack.namespace.
pack:
  #The namespace (on the target cluster) to install this chart
  #When not found, a new namespace will be created
  content:
    images:
      - image: docker.io/bitnami/mariadb:11.2.3-debian-12-r4
      - image: docker.io/bitnami/memcached:1.6.24-debian-12-r0
      - image: docker.io/bitnami/wordpress:6.4.3-debian-12-r16
    charts:
      - repo: https://charts.bitnami.com/wordpress
        name: wordpress
        version: 19.4.3
  namespace: '{{ .spectro.var.wordpress_namespace }}'
  spectrocloud.com/install-priority: 0
For replicaCount: '{{ .spectro.var.wordpress_replica }}', the variable was added to charts.wordpress.replicaCount.
   multisite:
      enable: false
      host: ""
      networkType: subdomain
      enableNipIoRedirect: false
    ## @section WordPress deployment parameters
    ##

    ## @param replicaCount Number of WordPress replicas to deploy
    ## NOTE: ReadWriteMany PVC(s) are required if replicaCount > 1
    ##
    replicaCount: '{{ .spectro.var.wordpress_replica }}'
    ## @param updateStrategy.type WordPress deployment strategy type
    ## ref: https://kubernetes.io/docs/concepts/workloads/controllers/deployment/#strategy
    ## NOTE: Set it to `Recreate` if you use a PV that cannot be mounted on multiple pods
For http: '{{ .spectro.var.wordpress_port }}', the variable was added to charts.wordpress.service.ports.http.
 ## WordPress service parameters
    ##
    service:
      ## @param service.type WordPress service type
      ##
      type: LoadBalancer
      ## @param service.ports.http WordPress service HTTP port
      ## @param service.ports.https WordPress service HTTPS port
      ##
      ports:
        http: '{{ .spectro.var.wordpress_port }}'
        https: 443
      ## @param service.httpsTargetPort Target port for HTTPS
      ##
      httpsTargetPort: https
Note that the variable syntax requires spaces at both the beginning and end of the variable, as well as a . at the
start of the variable.
Input Variables
With the references to the variables in place in the YAML file, you can modify their values in terraform.tfvars using the values listed in the following table.
| Variable Name | New Value |
|---|---|
| WordPress: Replica Count | 3 |
| WordPress: HTTP Port | 9090 |
| WordPress: Namespace | new-wordpress-ns |
##############################
# Application Configuration
##############################
wordpress_replica   = "REPLACE ME"           # The number of pods to be created for WordPress.
wordpress_namespace = "REPLACE ME"           # The namespace to be created for WordPress.
wordpress_port      = "REPLACE ME"           # The HTTP port to be exposed for WordPress.
Additionally, fill in the cloud-specific configurations. If you are using either Azure or GCP, find the relevant provider section. For this tutorial, the steps will use AWS.
Locate the AWS provider section and change deploy-aws = false to deploy-aws = true. Additionally, replace all
occurrences of REPLACE_ME with their corresponding values, such as those for the aws-cloud-account-name,
aws-region, aws-key-pair-name, and availability_zones variables. You can also update the values for the nodes in
the control plane or worker node pools as needed.
###########################
# AWS Deployment Settings
############################
deploy-aws     = false # Set to true to deploy to AWS.
deploy-aws-var = false # Set to true to deploy to AWS with cluster profile variables.

aws-cloud-account-name = "REPLACE ME"
aws-region             = "REPLACE ME"
aws-key-pair-name      = "REPLACE ME"

aws_control_plane_nodes = {
  count              = "1"
  control_plane      = true
  instance_type      = "m4.2xlarge"
  disk_size_gb       = "60"
  availability_zones = ["REPLACE ME"] # If you want to deploy to multiple AZs, add them here. Example: ["us-east-1a", "us-east-1b"].
}

aws_worker_nodes = {
  count              = "1"
  control_plane      = false
  instance_type      = "m4.2xlarge"
  disk_size_gb       = "60"
  availability_zones = ["REPLACE ME"] # If you want to deploy to multiple AZs, add them here. Example: ["us-east-1a", "us-east-1b"].
}
Save the file after you have finished providing your configurations.
Deploy Cluster with Cluster Profile Variables
Export your Palette API key as an environment variable. This step allows the Terraform CLI to authenticate with the Palette API.
export SPECTROCLOUD_APIKEY=<Your-Spectro-Cloud-API-key>
Before deploying the resources, ensure that there are no active clusters named aws-profile-var-cluster-tf or cluster
profiles named aws-profile-variables-tf in your Palette project.
Issue the plan command to preview the resources that Terraform will create.
terraform plan
The output indicates that three new resources will be created: two versions of the AWS cluster profile and the host
cluster. The host cluster will use version 1.0.0 of the cluster profile.
Plan: 3 to add, 0 to change, 0 to destroy.
To deploy the resources, use the apply command.
terraform apply -auto-approve
The cluster deployment takes a few minutes.
Log in to Palette, and click Clusters from the left main menu.
Navigate to the newly created cluster and select the Profile tab. The profile in use should be version 1.0.0. To verify that the resources were deployed successfully, you can use either the Palette's UI or the kubectl tool.
- Access Cluster with CLI
- Palette UI
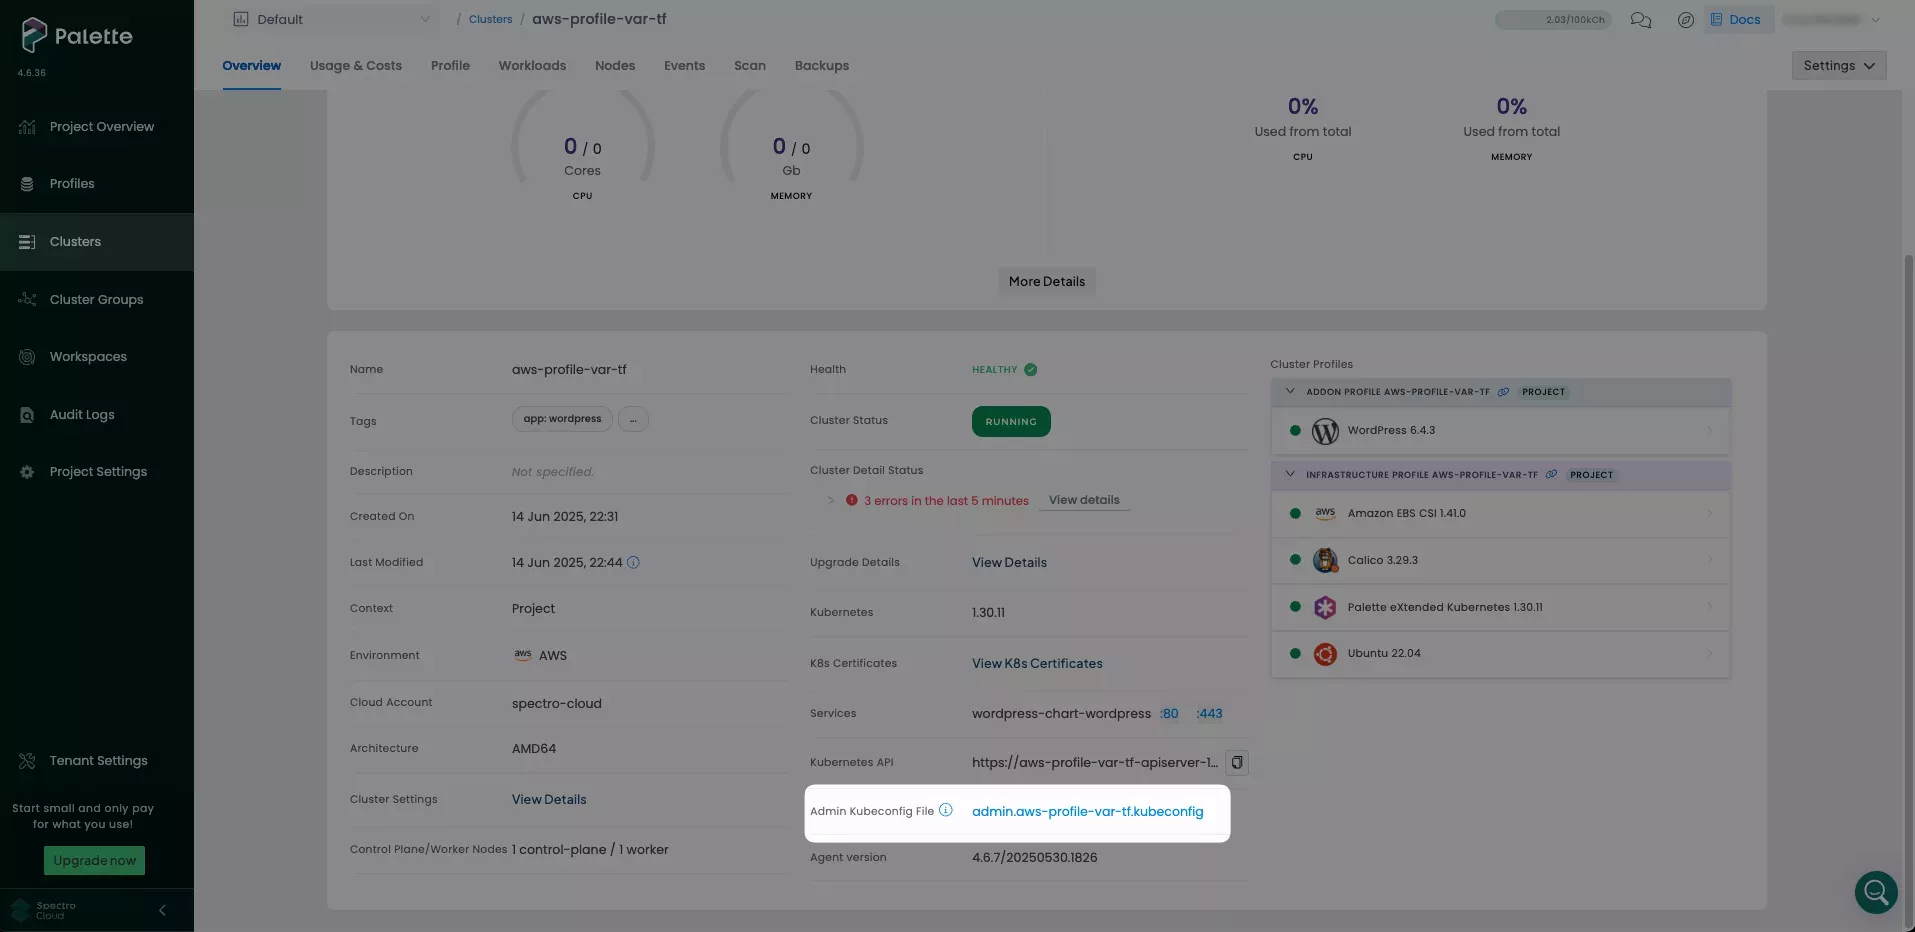
From the left main menu, select Clusters. Then, select the cluster you created in this tutorial. Select the Overview tab, navigate to the middle column containing cluster details and locate the Kubernetes Config File row.
Click on the Admin Kubeconfig File link to download the file.
Open a terminal window and set the KUBECONFIG environment variable to the file path of the kubeconfig file.
export KUBECONFIG=~/Downloads/admin.aws-profile-var-tf.kubeconfig
Use the following command to get a listing of the default pod deployment for the Wordpress app. Three pods are displayed similar to the following output: one for MariaDB, one for WordPress database memory cache and one for the WordPress web server. The row highlighted in the output is an example of the Wordpress web server.
kubectl get pods --namespace wordpress
NAME                                                   READY   STATUS    RESTARTS   AGE
wordpress-chart-wordpress-dd7d944cb-kw5dm              1/1     Running   0          23m
wordpress-chart-wordpress-mariadb-0                    1/1     Running   0          23m
wordpress-chart-wordpress-memcached-56cffcf458-fq59l   1/1     Running   0          23m
Navigate to the Workloads tab. Then, select Pods and filter for wordpress. Three pods are displayed similar to the following screenshot: one for MariaDB, one for WordPress database
memory cache, and one for the WordPress web server. This is the default deployment behavior for the WordPress pack.
Navigate to the Overview tab and click the 80 port to launch the WordPress blog page.
Return to your terminal window and modify the terraform.tfvars file so that deploy-aws-var is set to true. This
updates the cluster to use version 1.1.0 of the cluster profile, which contains the cluster profile variables.
##############################
# Application Configuration
##############################
wordpress_replica   = 3 # The number of pods to be created for Wordpress.
wordpress_namespace = "new-wordpress-ns" # The namespace to be created for Wordpress.
wordpress_port      = 9090 # The port to be created for HTTP for Wordpress.

############################
# AWS Deployment Settings
############################
deploy-aws     = true # Set to true to deploy to AWS.
deploy-aws-var = true # Set to true to deploy AWS with WordPress Pack and cluster profile variables
Issue the plan command to preview the resources that Terraform will create.
terraform plan
The output indicates that one resource, the cluster, will be modified. This will create a new namespace and three new
replicas for WordPress under the new namespace, without deleting the existing resources. The host cluster will use
version 1.1.0 of the cluster profile.
Plan: 0 to add, 1 to change, 0 to destroy.
To modify the cluster profile, use the apply command.
terraform apply -auto-approve
The cluster modification will take a few minutes.
Return to Palette, and click Clusters from the left main menu.
Navigate to your cluster and select the Profile tab. The profile in use should be 1.1.0. To verify that the resources were deployed successfully, you can use either the Palette's UI or the kubectl tool.
- Access Cluster with CLI
- Palette UI
Return to your terminal window.
Use the following command to get a listing of the default pod deployment for the Wordpress app. Five pods are displayed similar to the following output: one for MariaDB, one for WordPress database memory cache and three for the WordPress web server. The rows highlighted in the output are an example of the Wordpress web server.
kubectl get pods --namespace wordpress
NAME                                                   READY   STATUS    RESTARTS   AGE
wordpress-chart-wordpress-dd7d944cb-f2prh              0/1     Running   0          25s
wordpress-chart-wordpress-dd7d944cb-fdmwt              0/1     Running   0          25s
wordpress-chart-wordpress-dd7d944cb-n78rc              0/1     Running   0          25s
wordpress-chart-wordpress-mariadb-0                    0/1     Running   0          25s
wordpress-chart-wordpress-memcached-56cffcf458-hd9x6   1/1     Running   0          25s
Select the Workloads tab. Then, select Pods. Refresh the page and then filter for new-wordpress-ns
namespace. Three additional WordPress web server pods appear in the new WordPress namespace, new-wordpress-ns.
Navigate to the Overview tab and click the 9090 port.
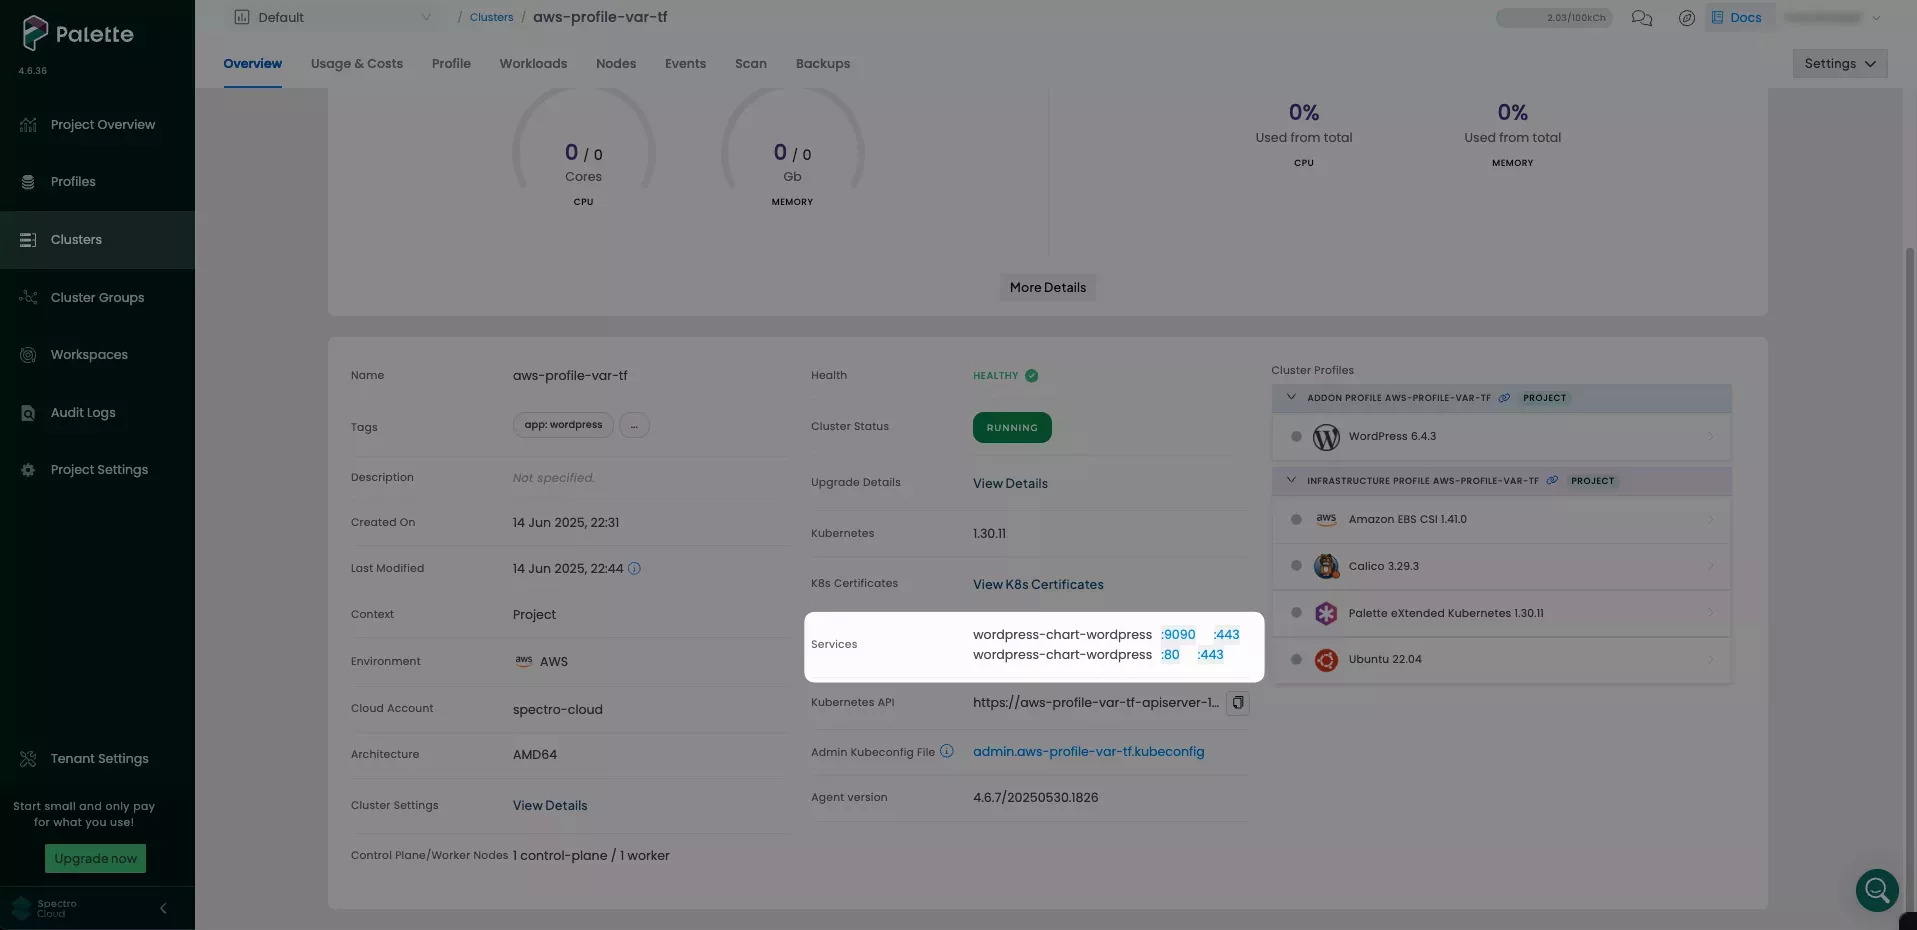
This launches the WordPress blog page. You may need to wait a few minutes for the port to be active.
Cleanup
Use the following steps to clean up the resources you created for the tutorial. Use the destroy command to remove all
the resources you created through Terraform.
terraform destroy --auto-approve
A successful execution of terraform destroy will output the following.
Destroy complete! Resources: 3 destroyed.
If a cluster remains in the delete phase for over 15 minutes, it becomes eligible for force delete. To trigger a force delete action, navigate to the cluster’s details page and click on Settings. Click on Force Delete Cluster to delete the cluster. Palette automatically removes clusters stuck in the cluster deletion phase for over 24 hours.
Wrap-Up
In this tutorial, you created two cluster profile versions, one with cluster profile variables and one without. You deployed a cluster and updated it to apply the cluster profile variables. Cluster profile variables provide the ability to leverage cluster profiles as a templating function.
We encourage you to check out the following reference resources to learn more about Palette.