Update a Cluster
Palette allows you to update active clusters. You can update any layer of a cluster, including all infrastructure layers and add-on layers. Depending on the nature of the update, a cluster update could trigger different cluster repave operations. For more information, refer to Repave Behaviors and Configurations for non-Edge clusters and Edge Cluster Upgrade Behavior for Edge clusters.
Palette requires explicit cluster-level approval to initiate repave operations, offering you more control over the repave schedule and methodology. Refer to Repave Behaviors and Configurations for more information.
Limitations
Once you upgrade your cluster to a new Kubernetes version, you will not be able to downgrade. We recommend that, before upgrading, you review the information provided in the Kubernetes Upgrades section.
-
You cannot update a cluster while its status is still Provisioning.
-
You cannot change the Container Network Interface (CNI) of an Edge cluster. You must delete and re-create the cluster instead. For more information about creating an Edge cluster, refer to Create Cluster Definition.
-
Avoid skipping minor versions when upgrading the Kubernetes version of a cluster. Refer to the documentation of your Kubernetes distribution for upgrade guidance and follow the recommended upgrade paths.
- For PXK and PXK-E, refer to Upgrade Kubeadm Clusters.
- For K3s, refer to K3s Upgrades
- For RKE2, refer to RKE2 Manual Upgrades
Update a Cluster
Prerequisites
- An active Kubernetes cluster in Palette.
Enablement
- Use a new cluster profile version
- Update cluster profile
- Override cluster profile configurations
This is the recommended best practice for updating a cluster in Palette.
-
Log in to Palette.
-
Navigate to the left Main Menu and select Profiles.
-
Create a new version of the profile you want to update. For more information, refer to Version a Cluster Profile.
-
Navigate to the left Main Menu and select Clusters.
-
Select the cluster you want to update, and navigate to the Profile tab of the cluster.
-
Next to the name of the profile, click on the version number and select the new version you just published.
-
Click Review & Save. Palette prompts you to preview the change summary.
-
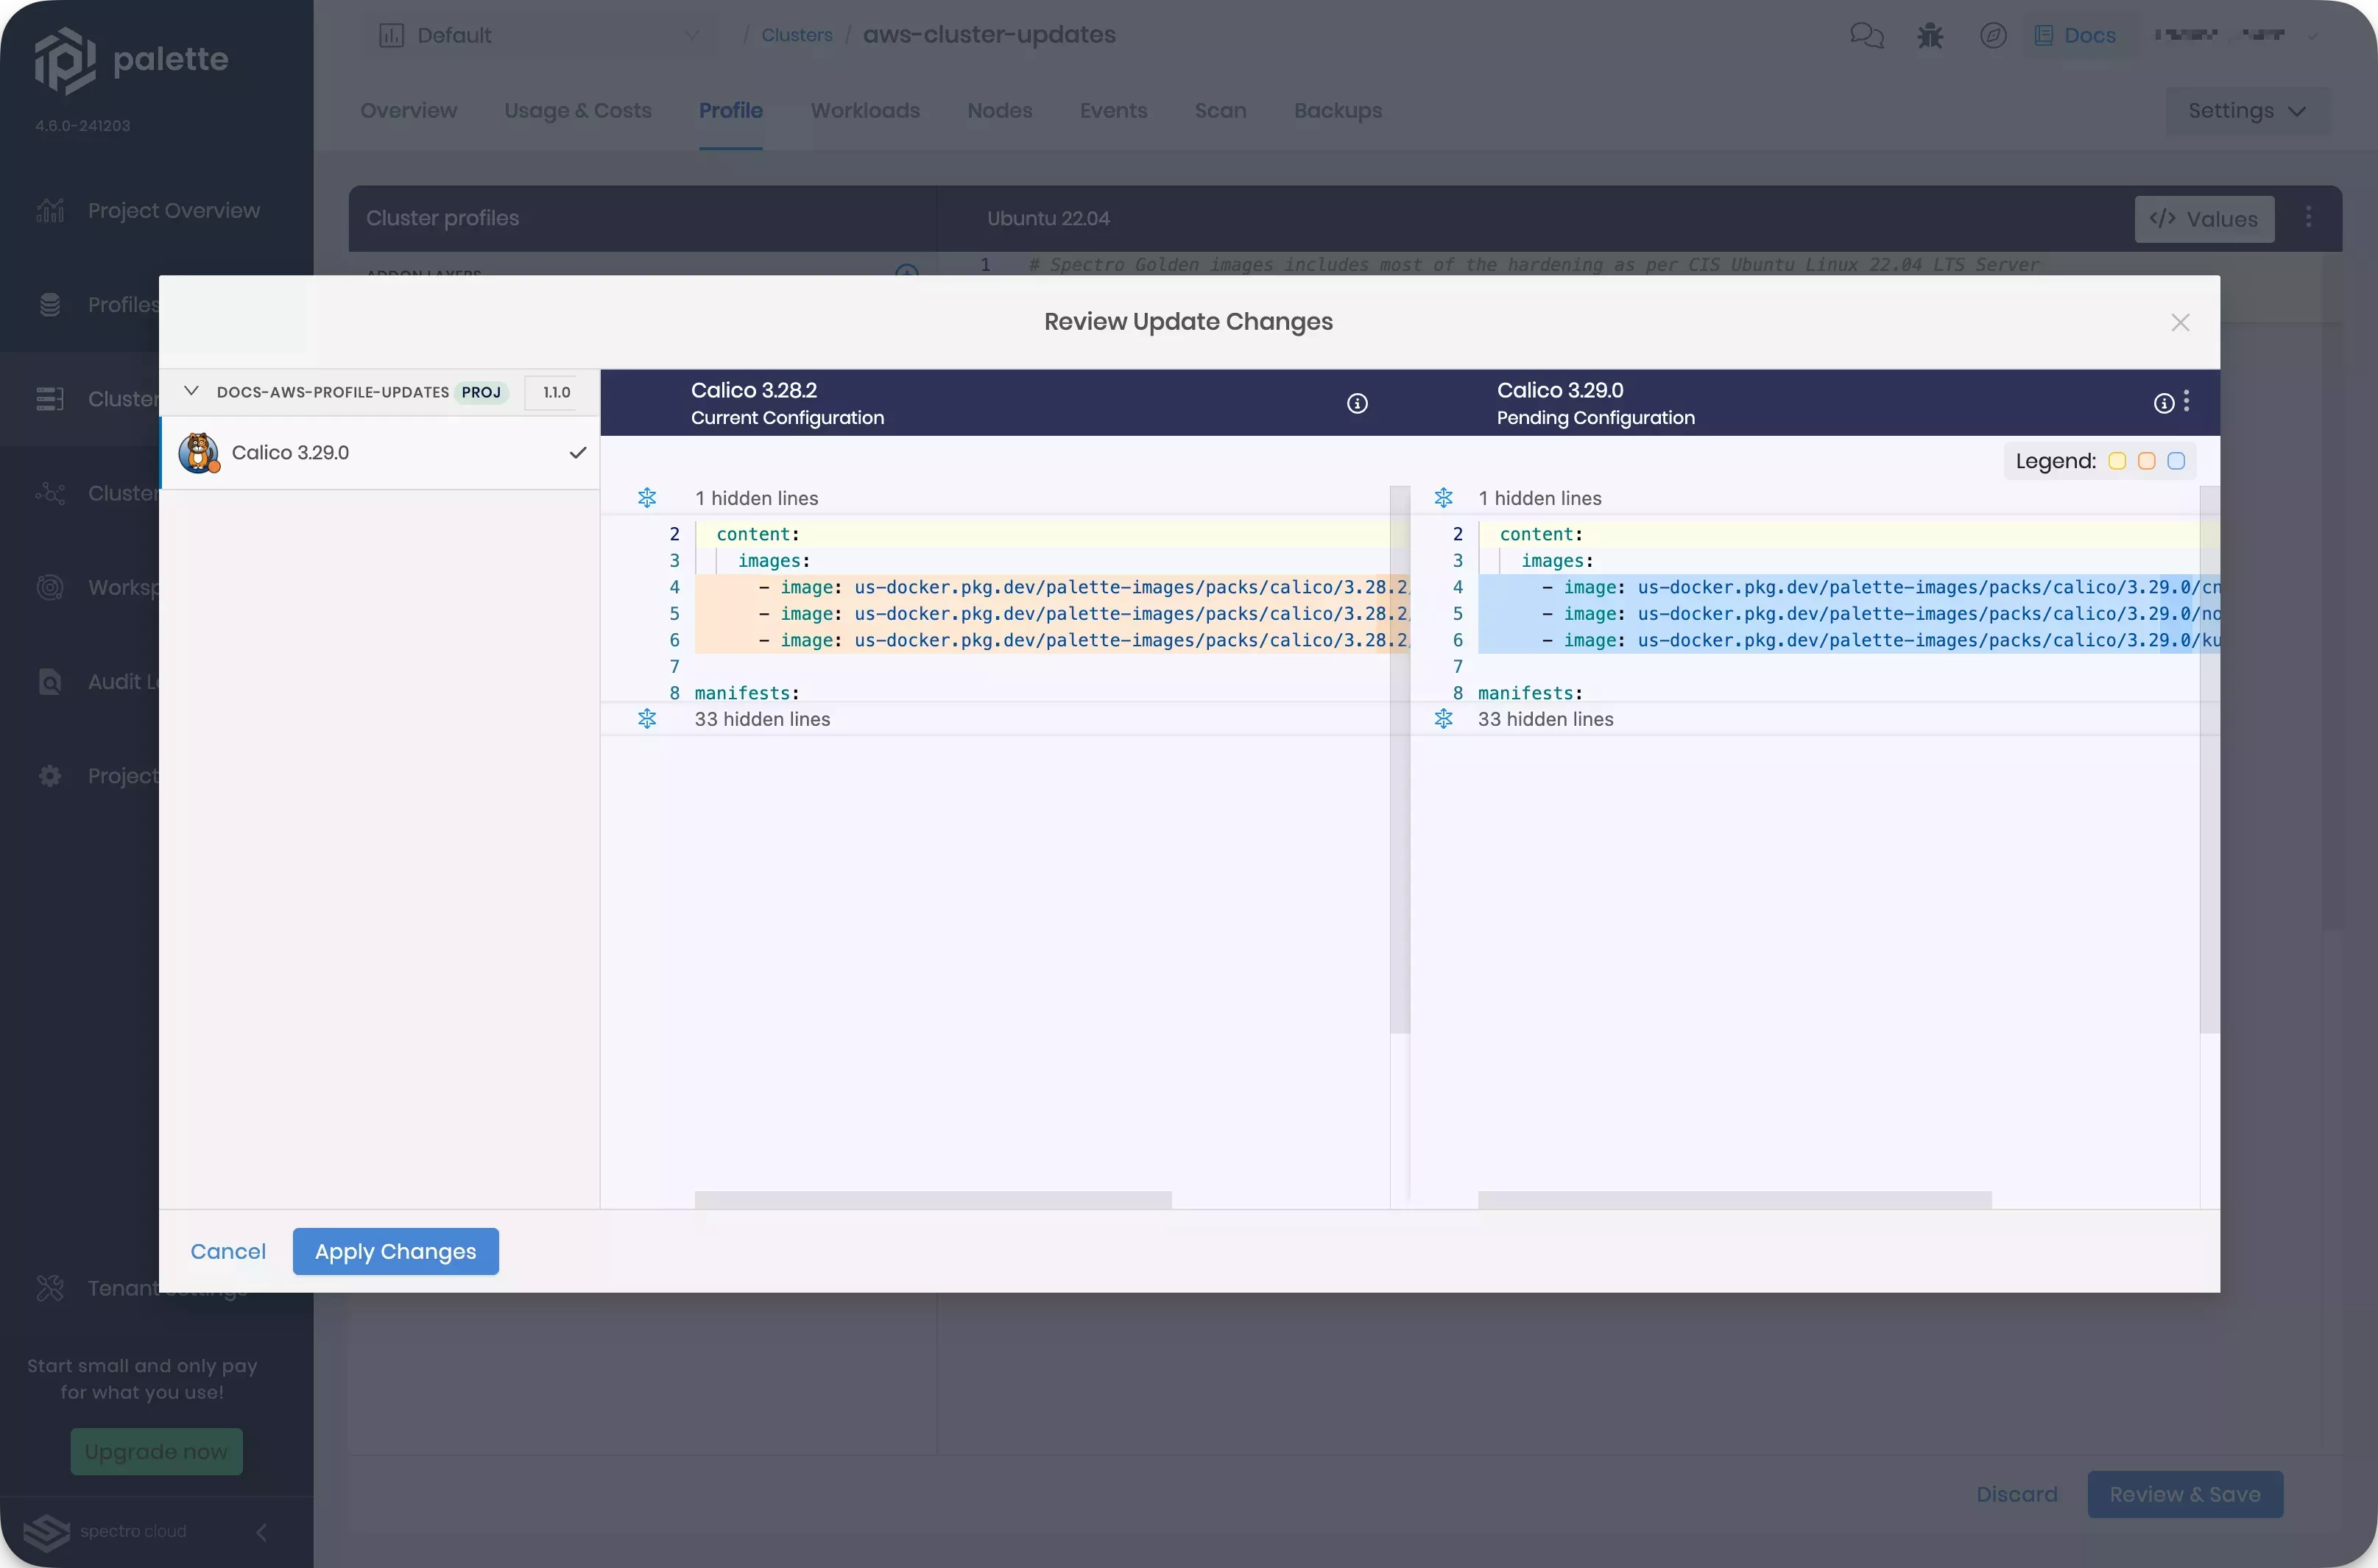
Click Review changes in Editor. Palette displays the changes, with the Current Configuration on the left and the Pending Configuration on the right. Review the changes and click Apply Changes.
infoMake sure to preserve any existing cluster profile overrides by using the editor on the right. Otherwise, the pending configuration will be applied as indicated.
You can make updates to a profile that is in use by one or more active clusters. Changing a deployed cluster profile will trigger an update to all clusters using the cluster profile. For more information, refer to Update a Cluster Profile.
We do not recommend updating a currently deployed cluster profile version to push out changes. Instead, we recommend you create a new profile version, and then upgrade active clusters to the new version. Check out the Version a Cluster Profile for guidance on creating a new cluster profile version.
You can modify the configuration of a deployed cluster without changing the cluster profile itself to update a cluster.
We do not recommend updating a currently deployed cluster's profile configurations without updating the profile itself. Instead, we recommend creating a new profile version, and then upgrade active clusters to the new version. Check out the Version a Cluster Profile for guidance on creating a new cluster profile version.
-
Log in to Palette.
-
Navigate to the left Main Menu and select Clusters.
-
Select the cluster you want to update, and navigate to the Profile tab of the cluster.
-
In the profile tab, make changes to the different layers as appropriate. The changes you make here are specific to this cluster only and do not propagate to the cluster profile or other clusters using the same profile.
-
Click Save to confirm your changes. Acknowledge the cluster repave warning if necessary.
Validation
You can follow these steps to validate all cluster update approaches.
-
Log in to Palette.
-
Navigate to the left Main Menu and select Clusters.
-
Select the cluster you updated, and navigate to the Profile tab of the cluster.
-
Confirm that the cluster is now using an updated profile.
Palette Reconciliation After Updating
When cluster profile updates are applied, Palette will apply the changes to the cluster but will not delete any resources that are no longer in use. You can choose to keep or manually remove these resources.
To remove unused resources created by a pack from a cluster, you need to manually delete the pack from the cluster profile and apply the changes to the cluster. This will effectively remove all resources associated with the pack. However, this approach may not always be desirable, and there are alternative solutions.
For example, you can use kubectl to scale the resource replicas to zero. While manually deleting the resource is an
option, Palette will automatically recreate it if the pack remains in the cluster profile. Scaling the replicas to zero
using kubectl ensures that no active instances of the resource are running, without triggering Palette to restore
them.
Prerequisites
- An active Kubernetes cluster in Palette.
- A terminal client.
Enablement
The following steps provide an example of how to clean up unneeded resources using kubectl. In this example, an AWS cluster is created using a cluster profile with the Hello Universe included. The Hello Universe pack
has the API preset option disabled.
-
Log in to Palette.
-
Create a cluster profile with two versions for an AWS IaaS cluster that includes the Hello Universe pack. For example:
Version 1.0.0.
- OS = Ubuntu
- Kubernetes = Kubernetes
- Network = Calico CNI
- Storage = AWS EBS CSI Driver
- App services = Hello Universe with the API preset option disabled.
Version 1.1.0.
- OS = Ubuntu
- Kubernetes = Kubernetes
- Network = Calico CNI
- Storage = AWS EBS CSI Driver
- App services = Hello Universe with the API preset option enabled.
-
Build a cluster using cluster profile version 1.0.0. This will take 15-20 minutes.
-
Download the Admin kubeconfig file from the cluster Overview tab and export the
KUBECONFIGenvironment variable to the file path of the kubeconfig file. -
Open a terminal window and run the following command.
kubectl get pods --namespace=hello-universe --output=custom-columns="POD_NAME:.metadata.name,CONTAINER_NAME:.status.containerStatuses[].name,CONTAINER_ID:.status.containerStatuses[].containerID"This command will display the containers in the cluster that are in the
hello-universenamespace. It will include the pod name, container name, and container ID. You can use these identifiers with variouskubectloptions.Sample output
POD_NAME                                     CONTAINER_NAME   CONTAINER_ID
hello-universe-deployment-6854947c67-ltdmq hello-universe containerd://584f07c2cf2dbb24f62e63be4322d16314d86e496eeb185c5a5944e884744239 -
Return to Palette and update the cluster using the profile version 1.1.0. Refer to the Update a Cluster section for instructions on updating your cluster.
-
Return to the terminal and run the following command.
kubectl get pods --namespace=hello-universe -o=custom-columns="POD_NAME:.metadata.name,CONTAINER_NAME:.status.containerStatuses[].name,CONTAINER_ID:.status.containerStatuses[].containerID"Sample output
POD_NAME                                     CONTAINER_NAME   CONTAINER_ID
api-86f745b67c-gk4lx                         api              containerd://21c7c18e42350efc25ea300e43c3471c64fba6953ae14bb2b46387c8e5d9c06d
hello-universe-deployment-6854947c67-ltdmq   hello-universe   containerd://584f07c2cf2dbb24f62e63be4322d16314d86e496eeb185c5a5944e884744239
postgres-567dc9cb4c-cd7fn                    postgres         containerd://b704c87e77ea468156d7f8033b7ad8d9a8ce6048e640b84c529572ac1fb41cd5
ui-f7ff4ddc5-hcv72                           ui               containerd://40f78fb4aef00445dc9cf051ca57d61f935594cbe1e426d1f193624769ac132d
With the cluster updated, note that the previous version of the Hello Universe app remains. This container, however, is not used with the API version and is no longer needed.
-
Locate the pod name of the container you want to remove and run the following command.
kubectl scale deployment hello-universe-deployment --replicas=0 hello-universe-deployment-6854947c67-ltdmq --namespace hello-universeSample output
deployment.apps/hello-universe-deployment scaled Error from server (NotFound): deployments.apps
"hello-universe-deployment-6854947c67-ltdmq" not found
This command will reduce the container count to 0, effectively stopping the container without destroying it.
If you have multiple clusters with resources no longer in use, you could put the command into a script to help scale down those additional resources.
Validation
-
Log in to Palette.
-
Navigate to the left main menu and select Clusters.
-
Select the cluster you modified, and navigate to the Workloads tab of the cluster.
-
Select Pods and filter for the deployment namespace.
-
Confirm that the unnecessary resources have been removed.